Sunday 26 May 2024

Santander Campaign – Day Two

Campaign Map

French attack Ramales
French occupy Villacayo
10 French army – hold Sarautz
11 French army – attack Ramales
12 French army – occupy Villacayo

British move up to border
British retreat to Soncillo
1 British army – move up to border
2 British army – defend Ramales
3 British army – retreat to Soncillo

Guerrillas
18 brigade – attack convoy outside Beasain
20 brigade – capture convoy outside Tolosa
21 brigade – move closer to border.

Battle of Ramales - Move 2

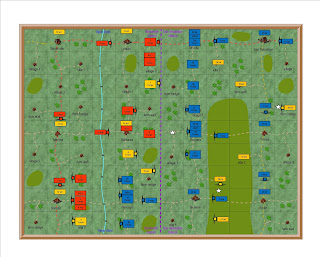
This was an encounter battle, once again on the border between Santander and Dan Sebastian districts.

4th British corps start the battle deployed either side of the main road to Ramales. 3rd British and 8th Spanish corps are just behind the town.

The French enter the table at the start of move 1.

The game objectives are the hill on the left, the woods in the centre and the farm on the right. At the end of move 2 the Spanish are climbing the hill, and 3rd British entering the farm. The French have entered the table and are advancing towards the allied army.

On the left the Italian corps quickly takes the hill, and the Spanish retreat in some confusion. The Spanish do rally, but are never able to launch a counter attack.

In the centre the British corps includes the light division, who occupy the woods. They are a very difficult objective for the Westhalian corps. The Spanish commander takes command of the Italian artillery and cavalry to support the attack in the centre. After a hard battle the woods is still disputed at nightfall.

On the right 31st French corps is a young guard formation, and should be able to take the farm. However at nightfall fighting still continues and the farm is firmly held by the British corps.

At nightfall the French have taken the hill, but the other two objectives are still contested. The British can claim victory because they still hold two of the three game objectives.

The French have lost 3 infantry, 6 cavalry and 1 artillery casualties (1900 men)
The British have lost 11 infantry and 3 cavalry casualties (4700 men)

Comments
As the French advance their lines of supply become more vulnerable to the Spanish guerrillas. There are two attacks, one convoy is captured the other drive off the guerrillas. The loss of 3 days supplies will take a few days to affect the corps concerned, but affect them it will.

This wargame was interesting. The combat ability of the six corps involved was very different.

On the left the Italian corps was only very slightly better than the Spanish corps holding the hill. But they could choose their point of attack, and ensure that their best brigades led the attack. Just one routed Spanish brigade led to the breakup of the whole corps.

In the centre the Westphalian corps slightly better than the Italians, but only just. They had to attack the famous light division, who held the woods. Despite having the support of the Italian cavalry and artillery they were hard pressed. They could not afford to attack the rifle brigade holding the woods. So they concentrated their artillery on the gap between the woods and the hill. This was held by the lighter British 6pdr guns, who still managed to hold their position until just before the end of the game. At nightfall only two of the four British brigades remained, but the rifles still held the woods.

On the right the French young guard corps should have taken the farm without any difficulty. However they lost two cavalry melee, resulting in the rout of their cavalry. This made it very difficult for the infantry to attack the farm, which was held by the elite Guards brigade. At nightfall the farm was still held by the British.

A great wargame, full of interesting decisions about which brigade to lead the attack, and when to order the attack. Not at all helped by the roll of (it felt like) a LOT of ones or two.
Sunday 19 May 2024

Hills in Wargames

Battle of Gadebusch

Hills have always played an important part in my wargames, and particularly since I started a campaign to provide battles to wargame.  

In a campaign it is difficult to recreate mountain ranges, such as the Alps.   To do so would require the whole table being covered in terrain which was impossible for corps and divisions to deploy on.   In Napoleonic campaigns these large areas were obstacles to be crossed, rather than areas to deploy and fight battles.   In some campaigns, such as the Iberian Peninsula, they would be the scene of small scale guerrilla combat.   More suited to skirmish type wargames, rather than corps sized games.  

In my campaign wargames hills are represented by largely flat topped oblong shapes, looking more like a series of ridges rather than mountain ranges.   This is because I wanted to allow my corps to deploy and fight, rather than struggle through a table where they could only follow one narrow track and fight a series of skirmish actions.

All arms are allowed to cross these obstacles, but at half movement rate.   Combat is usually fought as if on a ridge.   The defending artillery usually deploy on the forward edge facing the enemy.  The infantry usually slightly further back, to avoid the attacking artillery.    This makes them a very difficult target to attack.  

It also creates a lot of debate about whether attacking artillery can hit troops who are not at the front of the ridge, and therefore not in direct line of sight.   And if that is allowed why not defending artillery deploying in a similar position.   Then there is the question whether cavalry can charge on a hill, or up or down from a hill.   All of this would be allowed on a flat topped ridge, but would not be possible on a mountain range.

We have struggled with these questions for quite a long time.   One obvious decision leads to a less obvious one and so on.   Finally we have decided to redefine who can do what on “hills”.

In future only infantry will be allowed to engage in combat on “hills”.   Infantry, cavalry and artillery will all be allowed to move across hills, but at half movement speed.   However only infantry will be allowed to fight, and will do so exactly the same as on flat ground.  Artillery will be allowed to deploy on the forward edge of the hill, but nowhere else.

It will be interesting to discover whether this clear cut decision actually results in a series of unintended consequences.   This often happens when we bring in a new rule to overcome problems resulting from long time game play with two players who both know the rules extremely well.                     

Sunday 12 May 2024

Santander Campaign – Day One


Campaign Map

The campaign opens with a surprise French attack on Villacayo

10 French army – hold Sarautz
11 French army – hold Bergara
12 French army – attack Villacayo

1 British army – hold Laredo
2 British army – hold Ramales
3 British army – defend Villacayo


Battle of Villacayo - Move 8

The battle opens with 35 French corps attacking 6 British corps in front of the town
34 French and 36 Vistula corps arrive on the table at the start of move 2
5 British and 9 Spanish corps are allowed to move at the start of move 2

5 British occupy the farm on the right
34 French attack but are driven off

35 French corps attack in the centre, supported by artillery from 34 corps
6 British retreat slowly towards the town to avoid combat and delay the French attack

36 Vistula and 9 Spanish arrive at the hill on the left at the same time
The Poles storm the hill, and the Spanish retreat to avoid combat

At nightfall the French have taken two of the three game objectives and won the game

The French have lost 6 infantry and 2 cavalry casualties (2600 men)
The British have lost 3 infantry, 3 cavalry and 1 artillery casualties (1600 men)

Comments

The French have lost more casualties, but the British have lost more cavalry and gunners. They also have two brigades in rout.

The heavy French casualties is because the British in the centre, and Spanish on the left, have retreated to avoid casualties. In doing so they abandoned two of the three game objectives, leaving the French the winners

However there was more to it than that.

The British cavalry suffered heavy defeat due to really poor dice throw. This allowed the French to advance their cavalry and threaten the allied artillery.

The French suffered a similar defeat, again due to poor dice, on their attack on the farm on the right. They should have won the attack, but they rolled 3x1 and 1x2 out of 6 dice.

Although I would prefer that the dice did not play such an important role in the outcome, it is not too bad if it happens to both sides. It is also the only way to achieve a fast flowing game when both players understand the rules, and each other, so well. If neither side make a mistake, and if both can anticipate what the other is likely to do, the result is often a very slow moving and boring wargame.

This strong influence of luck, in the form of the dice, helps to add an element of unpredictably and total surprise to a game. Normally the attacker, usually me, is very cautious in the opening part of the game. Hoping to achieve casualties with his artillery, or cavalry, before risking his infantry in a frontal attack. If I can achieve this, the attack usually wins. It is pretty unusual to roll such poor dice, but it can (and did) happen in this game.

This is not a style which would suit everyone, but it does suit us.

Sunday 5 May 2024

Santander Campaign in Northern Spain


Campaign map of Northern Spain

This is the fourth campaign phase to be fought in Northern Spain.   As you can see from the map the British won two and the French one.

Santander is Wellington’s main supply base.   If the French can capture it, he will be forced to establish a new base at Llanes, causing considerable disruption to his lines of supply.   It will also allow Soult to establish his own base there, and shorten his lines of supply to France.

Example of a British corps

Wellington has nine corps under his command, but only six are British.   The remaining three are Spanish.  The three armies under Wellington’s command each have two British and one Spanish corps.    All nine corps have four infantry brigades, one cavalry brigade and corps artillery.   

There are also 12 Spanish militia brigades, one for each of the 12 cities and towns in the campaign.   These are not under Wellington’s command.   Each one is the garrison of a city or town.   When it is occupied by the French the garrison becomes a guerrilla band.   They must remain within the same district (nine squares on the map) and will carry out irregular operations against the French.   Mostly this will be attacks on convoys.   The outcome of such attacks will be decided by 1D6, and may result in casualties or the loss of the supplies.   Such loss will be deducted from the field army concerned.

Example of a French corps

Soult also has nine corps under his command.   There is one young guard corps, four French corps and one Polish, Westphalian, Italian and Vistula.   The non French corps have more conscript troops than the French ones.

There are also six reserve infantry brigades.   These are all conscript and provide the garrison of the six cities and towns in San Sebastian region.   They also provide the escort for supply columns moving through their district.

Any towns captured within Santander region must be garrisoned by a brigade from the occupying French army   This will weaken the French as they advance towards Santander.

Map of Spain

The two campaign areas in Spain present more problems than the three in Germany.   This is because of the difficulty in trying to recreate interesting wargames where there are such unbalanced armies facing each other. 

In northern Spain Wellington’s army has a history of wining almost every battle.   In southern Spain the Spanish army lost almost every battle they fought.   In a wargame this would result in very unhappy French players in the north, and Spanish ones in the south.

In northern Spain I have weakened Wellington’s army by making one third Spanish troops.    They are the best three corps in the Spanish army, but far below the combat efficiency of the six British corps.

In southern Spain the French have to garrison the six towns on their side of the map by detaching brigades from their field army.    They also have to detach further brigades as they capture Spanish towns.

Throughout Spain the French also have to protect their lines of supply from the many guerrilla bands.   Getting the balance right has proved very difficult.   Each combat is decided by rolling 1D6.   A low score will see the guerrilla rout, possibly with casualties.   A high score will result in them capturing the convoy, and possibly inflicting casualties on the escort.

This simple method works well, but can result in unwanted results, particularly if the Spanish are too successful.   The aim is not for the guerrilla to win the campaign, but rather to detract from the combat effectiveness of the French   But it is not possible to control the outcome of rolling one dice.

Usually at the end of a campaign phase in Spain the rules are reviewed to determine how well they have worked.  I have to be careful not to change them too often, as they often result in unexpected consequences.

All of this makes the campaigns in Spain must more interesting, and challenging, than in northern Europe.    So I am particularly looking forward to this next campaign phase.