Showing posts with label 75 - 1813 Campaign - 2024. Show all posts

Tuesday, 17 December 2024

Jean Campaign – Day Seven


Campaign Ma

Main French depot at Hellin – 18 days supplies

French occupy Je
Spanish attack Huelma
Guerrilla brigades active

13th French army – regroup and resupply at Ubeda
14th French army – occupy Jean
15th French army – defend Huelma

1st Spanish army – regroup and resupply at Linares
2nd Spanish army – retreat to Martos
3rd Spanish army – attack Heulma

5 guerrilla attack convoy Hellin to Tobarra – fail no casualties
9 guerrilla attack convoy Hellin to Elche – fail no casualties
13 guerrilla attack convoy Mortalalla to Huelma – fail no casualties

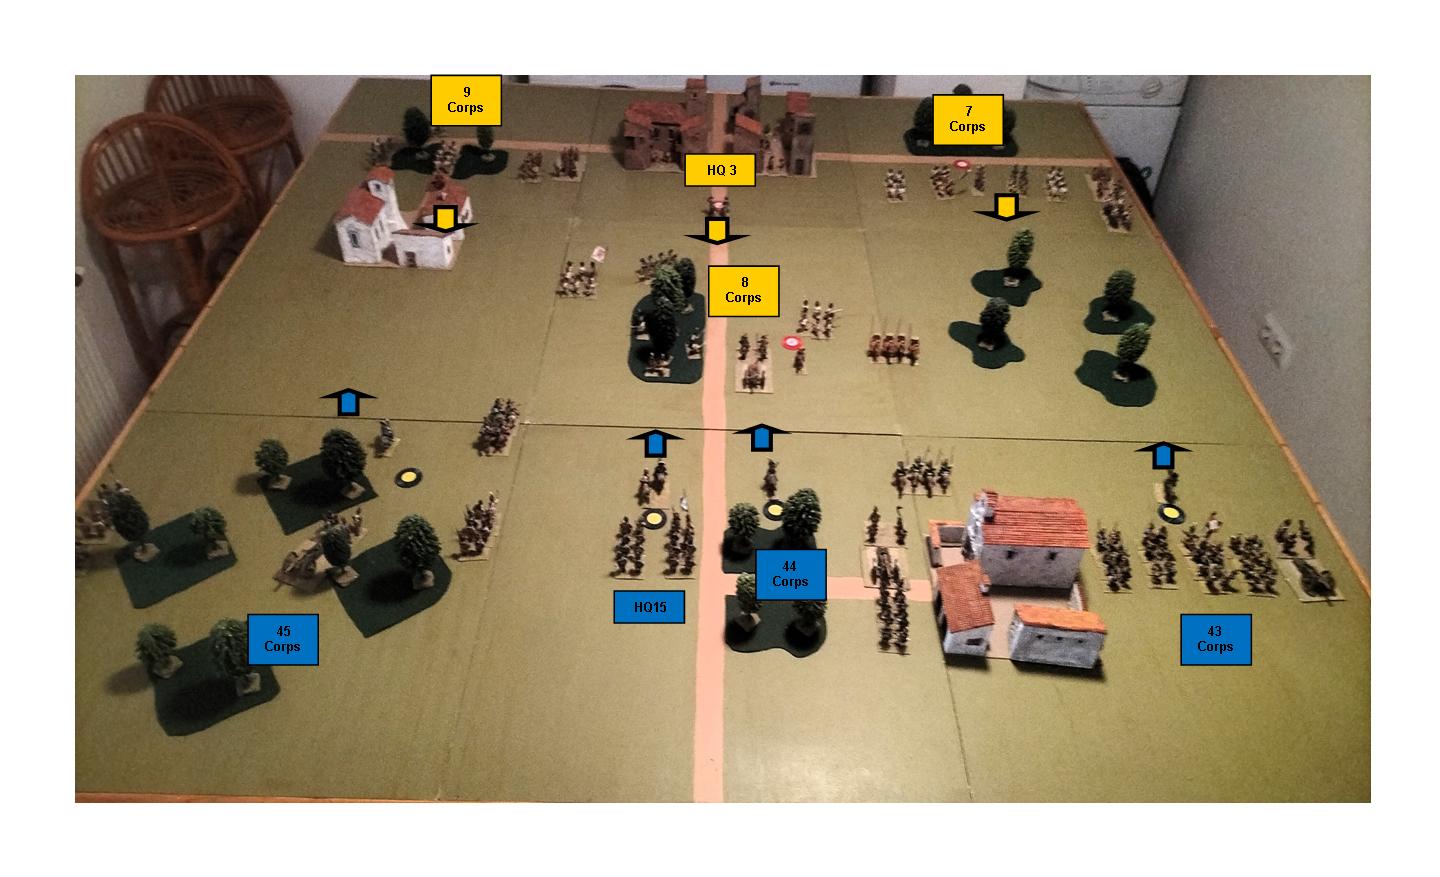
Second battle of Heulma – End of Move 2

15th French Army commanded by Marshal Augereau defend Heulm
3rd Spanish army commanded by General del Parque attack Heulma

French have 9 infantry brigades, 2 cavalry brigade, and 3 corps artillery
3 infantry and 1 cavalry brigades are detached to protect lines of supply
They have lost 3 infantry and 2 artillery battle casualties (500 men)

Spanish have 12 infantry brigades, 2 cavalry brigade, and 3 corps artillery
They have lost 7 infantry, and 1 cavalry battle casualties (2900 men)

Marshal Augereau was defeated at the battle of Alcaudete on 5 August
He retreated to Heulma where he rallied, regrouped and resupplied
This was the first French defeat of this campaign
General del Parque is determined to repeat his victory and retake Heulma

Comments

This is the first time in the campaign that the Spanish have attacked the French. Recent changes to the campaign mean that the French have to defend longer lines of supply and that the campaign does not end as soon as the French occupy the main Spanish city. They now have to be able to defend that city against a counter attack.

On the left 45th French corps have to hold the woods against 9th Spanish corps. The French outnumber the Spanish and they have 9pdr guns against Spanish 6pdr. The French hold this objective, but are unable to support the centre and right.

In the centre 44th Westphalian corps has to hold the woods and road junction against 8th Spanish corps. They do so until the last two moves, when the Spanish artillery weakens the infantry in the woods, who are then routed by an infantry attack.

On the right 43rd Italian corps have to hold the farm against 7th Spanish corps. The Spanish attack on the far right, and rout most of Iranian infantry and artillery. They then attack the farm, which is held by the elite 1st infantry brigade. Despite 20% casualties from close range artillery, the garrison hold, but are finally routed by an infantry attack. By then the farm is surrounded by Spanish infantry and casualties, and the garrison is forced to surrender.

The battle was won by infantry attacks, but decided by superior artillery. The Spanish had two 12pdr and one 6 pdr guns, the French had one 12pdr and two 9 pdr guns. The French started the battle with 10% casualties on two of their corps artillery, the Spanish were full strength. This gave the Spanish a considerable advantage in counter battery fire, which they took full advantage of. They could then move their artillery into close range of both the woods in the centre and the farm on the right. This allowed them to inflict heavy casualties on the defending infantry before their own infantry attacked.

A very interesting game resulting in a Spanish victory. But also enjoyable because it was not decided solely on the luck of the dice. The Spanish threatened with their weak 9th corps on the left, and attacked with their superior artillery in the centre and right. The Spanish commander took command of 8th corps artillery, which he used to support 7th corps attack on the farm, and then 8th corps attack on the woods. The result a well deserved Spanish

Sunday, 1 December 2024

Jean Campaign – Day Six


Campaign Map

Main French depot at Hellin – 27 days supplies

French attack Jean
No Guerrilla brigades active

13th French army – retreat to Ubeda
14th French army – attack Jean
15th French army – resupply at Huelma

1st Spanish army – retreat to Linares
2nd Spanish army – battle of Jean
3rd Spanish army - resupply at Alcaudete

Guerrilla brigades have no opportunity to attack French convoys
Battle of Jean – End of Move 4

French have 9 infantry brigades, 2 cavalry brigade, and 3 corps artillery
3 infantry and 1 cavalry brigades are detached to protect lines of supply
They have lost 1 infantry and 1 artillery battle casualties (500 men)

Spanish have 13 infantry brigades, 2 cavalry brigade, and 3 corps artillery
They have lost 3 infantry, 1 cavalry and 1 artillery battle casualties (1400

There are three game objective
The bridge on the left, the woods in the centre and the farm on the right
The army which holds at least two at the end of the battle is the winner

On the right 40th French corps have to cross the hill to reach the farm
They are outnumbered by 4th Spanish corps, but manage to capture the farm

In the centre 41st Baden corps are also outnumbered by 5th Spanish corps
They fight their way into the woods, but are routed by the Spanish infantry

On the left 42nd Polish corps match two infantry brigades on the left bank
The CinC takes command of the rest of the corps on the right bank
They force 6th Spanish corps to withdraw and secure both ends of the bridge

Having taken two of the three objectives the French win the battle

Comments
Once more the French had to avoid unnecessary casualties
They were also at a severe disadvantage, having detached 3 infantry and 1 cavalry brigades
They put the best two Polish infantry brigades on the left bank of the river, and took the bridge

On the right bank they forces the Spanish to retreat, but were unable to inflict serious casualties

In the centre they had a similar problem, but routed the Spanish cavalry with artillery fire
This allowed their infantry to enter the woods, but they were routed by a counter attack

On the right the French were attacked as they attempted to deploy between the farm and the hill
It was only when the Spanish cavalry were routed in the centre that they could attack the farm
After two rounds of melee the French infantry had to retreat into the centre of the farm
But they managed to rally and keep hold of the farm until the end of the battle.

This battle was decided by the infantry melee for the woods and the farm.
In both, the French had committed their elite brigades to the attack
However due to really poor dice (three 1’s out of four rolls) they lost the melee
They were driven out of the woods, but managed to just hold the farm

Another very enjoyable wargame, but it has made me ponder whether I should replace my D6 for D10 to determine combat and morale. No decision yet, I need some more play testing to confirm whether it is just bad/good luck, or the odds need to be wider.

Sunday, 24 November 2024

Campaign Casualties


A typical wargame

When I first started wargame campaigns, many years ago, I was striving to make the wargame campaign as like a real campaign as possible.   To this end I carried forward all battle casualties from one battle to the next.  I quickly realised that the result was usually that the side which lost the first battle also lost the campaign.  This was because wargame rules make it very difficult for a weaker side to beat a stronger side.   It was a very important lesson, and one which dictated how I would design all future campaigns.

I remember reading (in an old Wargames Newsletter I think) that a wargame battle will never be the same as a real battle – no matter how hard you try.  And the more experience I gained the more obvious and true this proved to be.   In fact the more you try, the more obvious it becomes.   This is true in map campaigns, but even more so on the wargames table.   Scale is impossible to overcome, as is terrain.    So I quickly accepted that whilst trying to make a wargames campaign feel like a real campaign is a reasonable aim, the most important objective is that it should be enjoyable.   After all, it is a warGAME.

When I created my current campaign I designed it to provide interesting and enjoyable wargames.  That was, and is, the primary objective.  To this end it was important that all wargames should be enjoyable for both players, and thus both should have a reasonable chance of achieving their aim.

My wife is my regular, indeed now my only, opponent.   After many years we can anticipate what each other will do in a given set of circumstances.  This is particularly so when we wargame, if only because there are a limited number of wargame options.   Consequently the element of luck, in the form of a dice, determines pretty well all of our wargames.

Each casualty in our wargames represent 10% of the unit concerned.   This is translated into minus 1 in all morale and combat tables.   We use a 6 sided dice to determine all morale and combat, so minus 1 is a disadvantage, but not a deciding factor.  In fact it is the same penalty as a unit gets for being conscript, whilst an elite unit gets plus 1.

During a wargame most units will carry out their orders, even if they are conscript.   When they receive one casualty they will usually still be able to do so.   Two casualties make it more likely that they will lose a combat or fail their morale.   When they receive three casualties they automatically rout.

At the end of a campaign battle casualties are transferred from the wargames table to the campaign map.   Next day the loser retreats one days march, winner occupies the town which had been the objective of the battle.   Second day both armies halt, redeploy, resupply and replace all battle casualties except 1 for each unit.    Any unit which suffered casualties during the previous battle will carry 10% casualties for the remainder of the campaign.

All casualties do not have the same effect on future battles.   Cavalry and artillery casualties have a much more important influence than infantry.   This is because of their role in the battle as a whole.  

The attacking side must degrade the enemy artillery before they advance their infantry into long range, and even more so into short range, of the enemy guns.  Failure to do so will almost certainly result in a failed attack and the loss of the battle.  There are only two ways to degrade artillery.   First is to kill their gunners.   Second is to kill their supports, whether infantry or cavalry.     

Counter battery fire in the Napoleonic period was not very effective.  Nor should it be in our wargames.   In my rules it requires a roll of six using 1D6.   This will result in 10% casualties to the enemy artillery.   They can still do serious damage to attacking infantry.

The most effective way is to charge the guns with cavalry.   The cavalry advance half a move, the gunners test morale.   If the gunners pass they fire at the cavalry at close range (2 to 6 for a hit).   The cavalry then have to test their morale.  If they charge home the gunners automatically rout with 10% casualties.   The cavalry are then milling around the deserted guns, disordered or shaken, with 10% casualties.   If the enemy cavalry are within charge range they are in serious trouble.

Our rules are simple to understand and use, but this example will demonstrate that they still provide difficult tactical challenges even to a player very experienced with their use.   I hope that this will also demonstrate that rules do not have to be very complicated to have enjoyable games, even when the rules are fully mastered.

Sunday, 17 November 2024

Jean Campaign – Day Five


Campaign Map

Main French depot at Hellin – 36 days supplies

French attack Linares
Guerrilla brigades active

13th French army – attack Linares
14th French army – regroup and resupply at Jodar
15th French army – rally, regroup and resupply at Huelma

1st Spanish army – defend Linares
2nd Spanish army – regroup and resupply at Jean
3rd Spanish army - rally, regroup and resupply at Alcaudete

14 guerrilla brigade – attack convoy to Mortalalla – fail and rout – guerrilla lose10%casualties
15 guerrilla brigade – attack convoy to Minateda – fail and retreat – no casualties
Battle of Linares – End of Move12

French start with 9 infantry brigades, 2 cavalry brigades and 3 corps artillery
Spanish start with 14 infantry brigades, 2 cavalry brigades and 3 corps artillery
Both sides have battle casualties, but the Spanish more than the French
Two of the Spanish infantry brigades are militia

The French cannot afford to lose too many casualties, particularly cavalry or artillery
They are only half way through the campaign, and will have to detach more brigades as garrisons
The battle plan is to concentrate artillery from 37 and 38 corps as a reserve grand battery
This will leave 37 corps (on the right) too weak to attack, they hope to pin 1 Spanish corps

The French are reluctant to use their cavalry against the Spanish artillery
And even the grand battery is unable to weaken the Spanish gunners
So the attack on the left and in the centre is slow to develop

The French do rout 2nd Spanish corps in the centre
They then attack the woods on the left and in the centre
The Spanish infantry put up a stiff defence and hold both woods to the end of the battle
There are no sufficient French infantry to attack the farm on the right
The Grand Battery do pound it, and cause 20% to the garrison
But the garrison hold their position and the farm at the end of the battle

Throughout the battle the Spanish withdraw as necessary to avoid the French artillery
But they mass behind the woods on the left and centre
They then counter attack as soon as the French infantry enter the woods, and mask their guns
Two French brigades are repulsed, and one Spanish brigade routs
But the Spanish continue to hold at least one section of woods at the end of the battle

This is a well deserved Spanish victory

Comments
The campaign is going exactly as planned.
It is anticipated that there will be 6 to 9 battles, and this is the fourth.

The French have to detach increasing numbers of infantry brigades to garrison captured towns
They also have to detach one of their cavalry brigades to protect their lines of supply
This means that as they advance they become weaker and weaker

The Spanish military garrison of each town become a guerrilla band when the town is captured

This means that they become stronger and stronger as the French advance.
The French have the same number of cavalry and artillery as the Spanish
But they are heavily outnumbered in infantry brigades

The French normally concentrate their artillery to batter the area of attack
They then send their cavalry to defeat the enemy cavalry, and hopefully their artillery
If this fails they used their concentrated artillery to out gun the Spanish gunners
The more cavalry and artillery casualties they receive the harder it is to do this

These tactics mean that the French get weaker as they advance and capture enemy towns
At the same time the Spanish get stronger, and attack the French lines of supply

In addition the Spanish have finally come up with a winning battle tactic
They keep their corps intact, and deploy their artillery to cover open ground
This means that the corps opposite the French without artillery will have an advantage
They keep their infantry behind cover of the three game objectives
By doing so they avoid artillery casualties, but can counter attack as the French advance
They keep their best infantry behind each objective to make the counter more effective
It worked to perfection in this battle, leaving the French unable to take even one objective

I was the French player in this game, but I was still very pleased with the outcome.

Sunday, 3 November 2024

Jean Campaign – Day Four


Campaign Map

Main French depot at Hellin – 48 days supplies

French attack Alcaudete
Guerrilla brigades active

13th French army – rally and resupply at Ubeda
14th French army – occupy Jodar
15th French army – attack Alcaudete

1st Spanish army – rally and resupply at Linares
2nd Spanish army – retreat to Jean
3rd Spanish army - defend Alcaudete

9 guerrilla brigade – attack convoy to Elche – capture 3 supplies – escort lose10%casualties
Battle of Alcaudete – End of Move 6

The French start the battle outnumbered in infantry by 12 Spanish to 9 French brigades.
French have 3 infantry and 1 cavalry battle casualties
Spanish have 7 infantry battle casualties

The French must weaken at least one of the three Spanish corps before they can launch an attack with any hope of success. This is usually done by the artillery, but can also be achieved by the cavalry. However one of the two French cavalry brigades have casualties, both Spanish brigades are full strength.

The Spanish start the game deployed on the three game objectives. The winner must hold at least two of them at the game.

The Spanish artillery have two 12 pounder and one 6 pounder guns. The French have one 12 pounder and two 9 pounder guns. The 12 pounders have longer range than the 9 pounders and the 6 pounder the shortest range.

The French artillery must move into effective range before they can unlimber and open fire. This means that the Spanish guns will always fire first, possible more than once. To achieve a hit on gunners requires a roll of 6, using 1D6.

Move 4 the Westphalian artillery receive a hit, fail their morale and retreat shaken.
The Spanish dragoons charge the French artillery, receive 10% casualties and rout.

Move 5 French artillery receive a hit, fail their morale and rout. The nearest infantry brigade has to test their morale because of the rout, fail and also rout. The Westphalian gunners fail their morale for being shaken, and now rout

Move 6 both French and Westphalian gunners, and the infantry brigade, fail their morale test and rout a further full move.

Just half way through the game the French have lost two of their three corps artillery. Worse still the gunners fail their morale and continue to rout for two moves. Even if they rally on move 7, it will be too late when they return to their guns to take any effective part in the campaign.

With only two casualties (200 men) the French commander has no choice but to halt the attack, and prepare to retreat. The Spanish are now so much stronger that they are quite likely to take the offensive and attack.

Comments
A very striking example of the weakness of rules which rely on 1D6 for combat and morale. The Spanish artillery rolled two 6s on their first two rounds fired. The French gunners rolled 1-3 in six morale tests.

Using 1D6 results in a fast moving and decisive wargame. Normally it works well, with both sides having their share of good and bad luck. When things do go wrong, as in this game, it is tempting to ignore the dice roll and roll again. But we never do. I was the French player in this game, and must confess to a short outburst at my bad luck. But you have to take the bad with the good. And the Spanish are overdue a win.

Hoping for better dice in the next game.

Sunday, 27 October 2024

Jean Campaign – Day Three


Campaign Map

Main French depot at Hellin – 60 days supplies
French attack Ubeda
Guerrilla brigades active

13th French army – occupy Ubeda
14th French army – attack Jodar
15th French army – rally and resupply at Huelma

1st Spanish army – retreat to Linares
2nd Spanish army – defend Jodar
3rd Spanish army - rally and resupply at Alcaudete

4 guerrilla brigade – attack convoy – capture 6 supplies – escort lose10% casualties
Battle of Jodar – Move 2

At the end of move 2 the Spanish are in position on the three game objectives.
These are the bridge on the left, the woods in the centre and the village on the right

The French enter the table at the start of move 1, and are delayed by the difficult terrain.
The CinC has taken command of most of 42 corps and is between the river and the hill

On the right the Spanish cavalry charge the French gunners as they emerge from the woods. The gunners take shelter in the woods, and the rest of the corps halt. 4 Spanish corps advance to pin them in the woods, and they remain there throughout the battle.

In the centre 41 Baden corps advance through the pass. They pin 5th Spanish corps between the woods and the village, and attack and take the woods.

On the left 42 Polish corps has two brigades on the left bank, and the remainder on the right bank commanded by the CinC. 6 Spanish corps have 6 pounder artillery, which are easily outgunned by the heavier French 9 pounders. The first attack in on the left bank, where the two Spanish brigades lose the melee and retreat. The CinC then moves forward his artillery, and the cavalry pin the infantry on the right bank. The squares take heavy casualties and the whole corps breaks and runs back to the town.

Having taken two of the three objectives the French have won the game

The French lose 1 infantry and 1 artillery casualties (500 men)
The Spanish lose 5 infantry, 1 cavalry and 1 artillery casualties (2200 men)

Comments

The French have won the first three battles, as was expected. Despite having detached 6 infantry and 3 cavalry brigades they are as strong as they will ever be. They have the advantage of surprise, and the Spanish army is not deployed at the start of the campaign.

During this period the Spanish guerrilla capture another supply train, killing 10% of the escort brigade and capturing 6 more supplies.

As the French advance they will have to detach more infantry to garrison the three towns they have taken. They will also have longer lines of supply, and be even more at risk from guerrilla attacks. In three days the French have lost 9 days supplies, leaving just 60 days for the rest of the campaign.

The French started the campaign with 90 days supplies. Each day they need 9 days, one for each of the 9 corps. The loss of 9 days to guerrilla means that they must complete their campaign in 8 days instead of  9.

In addition the supplies lost will have to be replaced from the main depot at Hellin.  It will take three days to reach Ubeda from Hellin, and each day they are subject to guerrilla attack. Of the 6 days supplies they lost today, 3 were to replace those lost yesterday. Clearly this will have a major impact on the mobility of 13th Army as they advance to take Linares and Andjuar.

To capture a convoy the guerrilla have to roll 5 or 6 with 1D6. If they roll 1 or 2 they lose 10% casualties. A 3 or 4 results in no casualties, the supplies continue to their destination and the guerrilla have to retreat to their base.

You will see that the French have been unlucky, not only to lose two convoys but for both of them to belong to the same army. The main depot at Hellin can divert supplies from 14th and 15th Army Groups, but they will still have to travel at least three, and possibly four, days to reach 13th Army.

It is very early days, but I am quite pleased how the new rules are affecting the campaign. I doubt that it will continue to have such an impact, but you never know!

Sunday, 20 October 2024

Jean Campaign – Day Two


Campaign Map

Main French depot at Hellin – 81 days supplies
French attack Ubeda
Guerrilla brigades activated

13th French army – attack Ubeda
14th French army – hold Elche
15th French army – occupy Huelma

1st Spanish army – hold Ubeda
2nd Spanish army – advance to border
3rd Spanish army - defend Huelma

5 guerrilla brigade – attack convoy – fail – no casualties
10 guerrilla brigade – attack convoy – fail – no casualties
14 guerrilla brigade – attack convoy – capture 3 supplies – escort lose10%casualties
15 guerrilla brigade – attack convoy – fail – no casualties
Battle of Obeda – Move 2

The game objectives are the three hills in the centre of the table
The winner will be the side who holds at least two of them

The game open with 3 Spanish corps in position on the centre hill
1 and 3 corps are either side of Ubeda, they may move at the start of move 1

The French army will arrive on the table at the start of move 1

By move 2 all corps were on the table, and it was clear that the Spanish would reach the game objectives before the French could. However the French were able to prevent the Spanish cavalry and artillery from taking up forward positions, and this would play an important role in the game

Only infantry could fight on the hills, and both 37 and 39 French corps infantry reached their objective without any artillery casualties, and without any threat from Spanish cavalry. The Spanish defenders put up a good fight, but the French took both hills.

Because 3 Spanish corps were deployed on the centre hill at the start of the game, their artillery were well placed at the entrance to the pass. This made it very difficult for 30 French corps, and their infantry could not advance until their artillery had forced the Spanish gunners to withdraw towards Obeda

At the end of the game the French had taken two of the three game objectives, and had won the game.

Comments
On this second day the Spanish were aware of the French invasion, and had issued orders for 1st and 2nd Armies to move up to the border. Both French and Spanish moved at the start of move one, and this allowed the Spanish to occupy all three objectives before the French could reach them

But the more aggressive French cavalry prevented 1st and 2nd Spanish corps cavalry and artillery from deploying at the French end of the two valleys, and this allowed the French infantry to attack without any danger from the Spanish cavalry or artillery.

On this second day of the campaign the Spanish guerrilla brigades were activated. Only four were able to attack convoys, but one of them managed to capture the convoy from Minateda to Mortallalla (in the south) and three days supplies.

For the first time I have limited the number of supplies available to the French. They have 90 days supplies, which is sufficient to resupply all nine corps for 10 days. It would take a minimum of 9 days for the French to reach all nine towns in Jean district. So they have only enough spare to supply all nine corps for one more day. When a corps runs out of supply it must immediately retreat until it can find supplies, and it has attrition losses of one casualty (400 infantrymen or 100 cavalry or artillery decided by a dice roll) for each day.

The French have already lost 1 day’s supplies for three corps to guerrilla activity. Not only will this disrupt the smooth arrival of supplies to 15th French army, it will also reduce the overall supplies for the campaign.

Sunday, 13 October 2024

Jean Campaign – Day One

Campaign Map

The campaign opens with a surprise French attack on Huelma

French main depot – 90 days supplies
13th French army – hold Riopar
14th French army – hold Elche
15th French army – attack Heulma

1st Spanish army – hold Ubeda
2nd Spanish army – hold Jodar
3rd Spanish army - defend Huelma

Battle of Heulma – Move 2

The battle opens with all three Spanish corps on the table, but 7th and 9th corps either side of the town and not allowed to move until the start of move 2. To win they must hold all three game objectives (in the centre three squares). Village on the left, small woods in the centre and large woods on the right. 8th corps is in and around the centre woods.

The French enter the table at the start of move 1. They engage 8th corps before the other two Spanish corps can arrive, but are unable to reach the other two objectives before the Spanish.

The battle is very even during the first six moves. On the left the Spanish hold the village and keep the French at bay. In the centre there is a prolonged fight for the centre woods. On the right each side holds two of the four sections of woods.

During move 7 the French attack the woods in the centre and drive out the Spanish defenders. Meanwhile they have occupied two of the four sections of wood on the right.

During move 9 there is extensive fighting for the village on the left and the woods on the right, but the French gradually gain the upper hand.

Move 10 is a bad one for the Spanish. One rout near the village spreads and all of 9th corps retreat. On the opposite flank there is a similar panic, leaving the French in possession of three of the four sections of woods. In the centre the French hold the small woods, but are unable to make any further progress. But the retreat of 7th and 9th Spanish corps forces 8th corps to do the same.

Comments
French start the game with two infantry brigades detached for garrison duty, and one cavalry brigade patrolling the lines of supply. The Spanish are full strength, plus one militia brigade in the town.

For this campaign the Spanish gunners have been increased from C to B class, making them the same as the French. In addition they have two 12 pounder and one 6 pounder guns. The French have one 12 pounder and two 9 pounder guns. This imbalance calls for caution where one side has the longer range guns.

The detachment of one cavalry brigade from each French army is new. One in three Spanish corps has always been without cavalry, and this change means that in each army only two of the three corps have cavalry support. This allows both sides to opt for the CinC to create a cavalry reserve to gain a local superiority. However in this game neither side do so.

This game was also the first to use the new maps. On the regional maps each square is a wargames table. They also show woods, rivers and mountains. The Huelma square is shown as wooded. The above photo illustrates how this would appear on the wargames table. The table appears quite open, but in fact there are different sized woods on six of the nine scenic squares. On a normal table there would usually be one or two.

This game was a good start to the campaign. It is unfortunate that the Spanish fell apart towards the end, but it could have happened to either side. It would take pages to explain exactly what happened, but it was a case of a low dice for a combat, followed by another low dice for the resulting melee. This resulted in one brigade routing, causing all friendly brigades within 4” to test their morale. Yet another low dice caused a second brigade to rout. That is half of the four infantry brigades in a corps, so the effect is a general retreat.

Sunday, 29 September 2024

Back to Spain

Campaign Map

Our next campaign will be set in southern Spain. The Fifth French Army Group, who are deployed in the military district of Hellin have been tasked to invade the adjoining district of Jean, which is held by the Spanish Army.

There have been considerable changes in both the campaign map, and the deployment of the French army at the start of the campaign.

The new campaign map covers a wider area than the previous maps. It is now five tables wide by three tables deep. The three on the left are Jean district and the two on the right Hellin district. Each square represents one 2x2 foot scenic square on the wargames table.

Typical Spanish Corps

This photo shows a typical Spanish corps. There are four infantry brigades, one cavalry brigade and one corps artillery. There are nine such corps in the campaign, organised in armies of three corps each, however three of them have no cavalry brigade.

When I planned my Spanish army, back in 2000, I did so with a completely different order of battle in mind. There were to be 8 infantry units of 36 figures, 2 cavalry units of 8 figures and 4 guns. This would leave them with less cavalry than all other armies. This was deliberate, as I wanted the Spanish to be weaker in cavalry than the French or even British. It seemed sensible at the time, but has since proved a serious problem as I rewrote the orders of battle to suit different campaigns.

My current Spanish order of battle has three armies of three corps each. Two corps have four infantry, one cavalry and corps artillery. One corps has four infantry and corps artillery only – no cavalry brigade. The Spanish also have 15 militia brigades, one each for each of the 15 cities and towns in the campaign. This was meant to make up for the lack of Spanish cavalry.

Getting the balance right between Spanish and French has been an ongoing problem. The Spanish were weaker in cavalry, but also less efficient infantry and artillery. Their guns were 12 pounder, with longer range than the French 9 pounder. But their crews were C class, against the French B class. Half of their regular infantry were C class, against one quarter of the French infantry.

I wanted to redress the balance in this campaign, and have done so by making their gunners B class. I justify this by an impression gained over the years that the Spanish artillery was better than either their cavalry or infantry. Two guns in each army are 12 pounders, one 6 pounder. The heavier guns have an advantage over the French artillery, but the 6 pounder is at a distinct disadvantage as its range is shorter.

Because there are more towns there are also more militia brigades. When the French occupy a town, its garrison become a guerrilla brigade. They must operate within the nine squares surrounding their town, but they are still a serious threat to French lines of supply.

Typical French Corps

There are nine French corps, each consisting of four infantry brigades, one cavalry and corps artillery. However this field army also has to provide one infantry brigade for each town under French control, and this includes the six towns in Hellin district. So even before the campaign starts six infantry brigades have been detached. In addition one cavalry brigade from each of the three French armies are detached to patrol the lines of supply. Each army now has the same number of cavalry available as the Spanish armies. It also means that in each battle one of the three corps on each side does not have any cavalry. This adds a new tactical problem to both players.

If the French manage to take the first three towns in Jean district they will have to detach three more infantry brigades before they can advance to fight second three battles, which usually decide the winner

The French get weaker and weaker as they pursue the retreating Spanish. This should make the two armies more even, though with the heavy reliance on dice it may take some time to confirm whether this is the case or not.

Sunday, 22 September 2024

End of Halle Campaign

1 August 1813 – Halle Campaign - Day 7

French halt at river Saale
4 French army – resupply at Mansfield
5 French army – rally and resupply at Eisleben
6 French army – rally and resupply at Querfurt

Russian hold Konnern, Halle and Luena and win the campaign
1 Russian army – resupply at Konnern
2 Russian army - resupply at Halle
3 Russian army – rally and resupply at Luena

Battles fought during the Halle campaign


The French won four of the six battles fought.
However the Russians still held the city of Halle

The French won the first three battles at Mansfeld, Eisleben and Querfurt.
The Russians won the next two at Konnern and Halle
The French won the final battle at Luena, but  had to retreat
With Konnern and Halle in Russian hands, Luena was too isolated to hold

Despite winning four of the six battles, the French were unable to take Halle
This was the campaign objective and to win they had to take and hold the city
The Russians held Konnern, Halle and Leuna and won the campaign.
Battles fought in Erfurt Region

This was the fourth phase to be fought in central Germany since the sixth campaign began in June 2020. The French won two and the Russians also won two. There have been 23 battles to wargame, the French have won 15 and the Russians 8.

Comments

This campaign was fought during July and August, what we consider high summer here in Spain. Temperatures are usually 34-39c, and outside activity greatly reduced. We try to complete any outside work by 0900 each day, and after that follow the Spanish tradition and try to keep out of the sun.

Our annual family visit is also in August. Our son and his family of five visit us for three weeks. They pretty well take over the house but over the 18 years they have been spending their holiday with us we have developed a well tried routine.

Now that the children are 18, 14 and 10 they are no longer banned from the wargames room. Unfortunately, like their dad, they have no interest at all in Wargaming. But our daily routine includes an hour or two of Wargaming, during which they keep clear of the wargames room (which includes the fridge containing their supply of ice cream and ice lollies).

Given the above I think we have done quite well to complete six wargames in the six weeks it took to complete the campaign. One game a week is our norm, and we managed to maintain that average even during the three hectic weeks of their visit.

Sunday, 15 September 2024

Halle Campaign – Day Six


Campaign Map

French attack Luena
4 French army – regroup and resupply at Mansfield
5 French army – retreat to Eisleben
6 French army – attack Luena

Russian hold Luena and regroup at Halle
1 Russian army – regroup and resupply at Konnern
2 Russian army – rally and regroup at Halle
3 Russian army – defend Luena

Battle of Luena – Move 4

The Russian army occupied a very strong defensive position behind the river Saale. The river could only be crossed by bridge, and only the two western ones were available to the French. It would take a considerable time for 18th (left) or 17th corps (centre) to cross. 16th corps (right) had no obstacle on the right bank of the river. The Russian army was not allowed to advance towards the river as it would be impossible for the French to cross if either bridge was within artillery range of the enemy.

On the left the village was the first objective. It took five moves, almost half of the game, for 18th corps to cross the river. They had to attack the village without waiting for artillery preparation. The Russians withdrew to avoid their artillery, but counter attacked as soon as the French entered the village. The fight for the village was between two elite brigades, and was fought during the last two rounds of the game. The French won and took the village.

The hill in the centre was the second objective. This would be an infantry battle, as cavalry cannot fight on hills and artillery can only fire on targets lining the front of the hill. Despite support from both 16th and 18th corps, 17th corps was unable to take the hill. They also took five moves to cross the bridge and had only two moves to attack and take the hill. The Russian infantry withdrew to the rear of the hill, which further delayed the attack. The hills was still in dispute at the end of move 12.

The bridge on the right was the third objective. The winner would have to hold both ends to secure it. The French CinC took command of the artillery of 17th and 18th corps and advanced down the left bank of the river. The rest of 16th corps were on the right bank. The Russians outnumbered the French on the right bank, so the French artillery would have to force them to retreat. They did so, and the French took and held the bridge.

The French were the clear winners.
The French lost 4 infantry and 1 cavalry (1710 casualties)
The Russians lost 5 infantry, 1 cavalry and 1 artillery (2200 casualties)

Comments

Defended river crossings are very difficult in a wargame, just as they are in real life.

If there are a limited number of crossing points, and the defenders can position their artillery close to each one, it is pretty well impossible for the attacker. He must cross the river in a long single file. If his leading brigade is forced to retire, this will disrupt the rest of the corps behind them.

There are only two alternatives. Either the attackers start the game on the defenders side of the river, or the defenders are not allowed to position their artillery within range of their side of the crossing points. I have tried both options, and I think the former results in a better wargame. However it does rob the defender of a major advantage.

The crossing of the river takes much longer than it would do in real life. In my campaign each operational day is 12 hours or 12 wargame moves. This is normally long enough for the attacker to advance within artillery range, fire his guns for 2 to 4 moves and still have sufficient time to fight the infantry battle. But if it takes 4 moves to cross the river he must attempt an attack with insufficient artillery or cavalry preparation.

I, as the French attacker, was lucky in this game. I did not suffer any setback due to Russian cavalry or artillery, which often happens. So I was able to reach the objective and carry out an infantry assault. This worked on both flanks, and would have done so on the hill in the centre if I had another two moves. I managed to take half of the hill, and outnumbered the Jan, the Russian defender, on the other half.

An interesting and enjoyable game. But it did feel unfair and artificial that the Russian artillery were not allowed to deploy within range of the two bridges.

Sunday, 8 September 2024

Halle Campaign – Day Five


Campaign Map

French attack Halle
4 French army – rally and resupply at Mansfeld
5 French army – attack Halle
6 French army – rally and resupply at Querfurt

Russian hold Konnern and defend Halle
1 Russian army – rally and resupply at Konnern
2 Russian army – defend Halle
3 Russian army – rally and resupply at Luena

Battle of Halle – Move 4

The Russians started the battle deployed on the three campaign objectives
The town on the left, the woods in the centre and the farm on the right
The French arrived the top of the table at the start of move 1

Once more the French CinC concentrated the artillery of two corps, supported by one infantry brigade. This was deployed to the left of the main road between the woods and the hill.

Both 13th and 15th French corps were delayed by having to cross a hill. It was harder for 15th corps on the left, the Russian cavalry and artillery were within artillery and cavalry charge distance from the bottom of the hill.

This delay caused major problems for the French, as did concentrating their artillery. The two corps without their own artillery had to rely on the CinC, who could only support one corps at a time.

The Russians still held all three objectives at the end of the game, and were the clear winners.

Comments

Jan, the Russian player, countered the massed French artillery by deploying her artillery well forward, and keeping her infantry out of artillery range. She also attacked the French artillery with her cavalry as soon as it came within charge range. Maximum artillery range is 12”, the same as cavalry charge range.

To counter this the French cavalry had to engage, and hopefully defeat , the Russian cavalry before they could endanger the French artillery. Two of the Russian cavalry brigades were cuirassiers, and only one cossack. The French had one cuirassier, one dragoon and one hussar brigade. So the cavalry were evenly matched.

The cavalry brigade which declares a charge gets plus one on the combat dice for “impact”. This is only during the first round of melee, but it does give the defender a brief, but significant, advantage. The attacker has to move his cavalry within charge move of the defending cavalry.

Our move sequence is decided by drawing a poker chip. There is one for each commander and when drawn his corps moves. The attacking player attempts to move his cavalry within charge move of the enemy cavalry after they have had their move. He must then hope that his chip is drawn first next move, so that he can declare the charge. I am usually the attacking player, and more often than not the defender chip is drawn first and I have to accept the charge.

The cavalry combat sequence is as follows

Attacker declares charge and moves forward 6”
Defender test morale to counter charge
First round of melee is fought, attacker gains plus 1 for impact
During defenders turn his cavalry are rallied and fight a second round
This continues until one side lose their morale and withdraw.

So a cavalry combat is a very uncertain affair. Particularly as it is decided by one D6, plus or minus for combat factors such as type of troops, casualties, commander and supports within 4”. The dice is thrown by the side with the higher combat factor

1 or 2 Winner suffers 10% casualties, both are disordered
3 or 4 Both suffer 10% casualties and both are disordered
5 or 6 Loser suffers 10% casualties, both are disordered

Any brigade with casualties must then test morale, again one D6 plus or minus morale factors, similar to combat factors

1 rout 12” directly away from winner, all brigades within 4” must also test morale
2 retreat 12” away from winner, shaken and must rally to return
3 retreat 12” away from winner, disordered and rally automatically next turn
4 remain in place but disordered, will rally automatically next turn
5 or 6 pass morale test

You will see from the above that even with better cavalry than the enemy, it is still a very risky option to move within charge range and hope to be able to charge first next move.

In this game, as in so many, the attacking cavalry lost the melee and left the advancing infantry and artillery at the mercy of the enemy cavalry.

Sunday, 25 August 2024

Halle Campaign – Day Four

Campaign Map

French attack Konnern
4 French army – attack Konnern
5 French army – rally and resupply
6 French army – occupy Querfurt

Russian retreat to Leuna
1 Russian army – defend Konnern
2 Russian army – rally and resupply
3 Russian army – retreat to Luena
Battle of Konnern – Move 2

The Russian army is deployed on and around the three game objectives.
The bridge on the left must be held at both ends
The hill in the centre must be held to deprive any movement towards the town
The village on  the right must be held

The Russians start the game as shown in the photo. They are not allowed to move forward to attack the French. If allowed to do so and they routed just one brigade the game would be over. So the French are allowed to cross the two bridges at the top of the photo unopposed.

Artillery can only fire on troops lining the edge of the hill, and cavalry can only move across hills, they are not allowed to fight on them. So the hill in the centre was always the most difficult of the three campaign objectives. The French do not attempt a determined attack, and the Russians still hold it at nightfall.

The village on the right is the easiest, and the Young Guard is given that objective. Despite their best efforts the Russians hold the village throughout the game, and still do so at nightfall

To take the bridge the French must attack along both sides of the river, in order to take and hold both ends of the bridge. 12th corps cavalry and infantry attack along the left bank. The CinC attacks along the right bank.   He takes command of the artillery from 11th and 12th corps, plus the cavalry and one infantry brigade from 11th corps. They finally take both ends of the bridge, but it is then too late to redeploy to attack the hill in the centre, which was the original plan.

The Russians held two of the three game objectives and thus won the game

Comments

The wargame has twelve moves, to keep it in line with the campaign which has 12 active hours in each day. This decision was taken back in 2009 when I started the campaign and was not based on any serious consideration about how long the wargame need to last. It was just a nice fit to have one move equate to one campaign hour.

It has worked very well during the 482 wargames which the campaign has produced. I particularly like the fact that it results in a fast moving game, because if the attacker waits too long he will run out of time before achieving the game objective.

We use a 6x6 foot wargames table, consisting of 9 2x2 foot scenic squares. The table is an accurate reproduction of the wargames map, which has a square grid. Each square on the campaign map is a 2x2 foot scenic square.

The game always starts with 2 foot between each army. Cavalry have a movement rate of 12”, so would cross that distance in two moves. Artillery has a rate of 8”, as do infantry in column of march, and would take three moves to cover that distance. Infantry in attack column have a rate of 6”, and would take four moves to cross the distance. 12 pounder guns have a maximum range of 12”. These distances determine how all games are played.

In general terms it takes the attacking army 3 to 6 moves to advance 12” from the enemy and deploy into attack formation. The artillery is usually deployed within 4 moves, and then has four moves to soften up the defenders, and for the cavalry to engage, and hopefully, defeat the enemy cavalry or gunners.

The attacking infantry usually has 4 to 6 moves to attack the game objectives and defeat the enemy infantry.

If this timetable is followed the attacker usually has a slight advantage. This is because he can reinforce the attack on the weakest of the three game objectives. He has to take and hold at least two to win the game.

However just one set back can throw the attack time table into disorder. The attacker always has to move into attack range, just under 12”. This allows the defending artillery to fire before he can, and the defending cavalry to charge him. If the defending cavalry win the melee, or if a lucky artillery shot results in a rout, the attack stalls until the attacker can rally the shaken or routed brigades. This usually takes at least two moves, and often results in the attack running out of time.

When the attacker has to cross a river at the start of the game, as in this case, the odds are against keeping to the timetable. Major rivers can only be crossed by one of the limited number of bridges. The attacker can concentrate his artillery against their side of the bridge and have a very good chance of routing one of the brigade columns before they can clear the river. They must rout directly away from the artillery causing the hit, which means routing through the remaining columns waiting to cross the bridge after them.

To avoid this I have recently either allowed the attacker to start the game on the enemy side of the river. Or, as in this game, had a special rule which stopped the defender from advancing to less than 12” from their side of the bridge.

Worked well in this game, though time was a factor and worked against the attacking French once again.

Sunday, 18 August 2024

Halle Campaign – Day Three

Campaign Map

French attack Querfurt
4 French army – rally and resupply
5 French army – occupy Eisleben
6 French army – attack Querfurt

Russian retreat to Halle
1 Russian army – rally and resupply
2 Russian army – retreat to Halle
3 Russian army – defend Querfurt

Battle of Querfurt – Move 2

3rd Russian Army is fully deployed on the three game objectives at the start of the battle. 7th corps on the hill on the right, 8th corps in the woods in the centre and 9th corps in the farm on the left. Winzingerode has taken command of half of 8th corps, from the woods to the hill on the right

6th French Army arrive at the start of move 1. 16th French corps on the right advance towards the hill, 17th Polish corps in the centre towards the wood in the centre and 18th Vistula corps advance over the hill on the left. Poniatowski has taken command of the cavalry brigades of 16th and 17th corps.

The Russians occupy a strong defensive position. On the left their cavalry and artillery are poised to attack as soon as the 18th corps come down from the hill. The Poles have to march across the hill and descent to the right to avoid this.

The centre is also difficult to attack. Russian infantry hold both the farm and the woods, and have the remainder of 8th corps between the two strong points. The Polish corps cannot risk an attack until they can weaken the Russian defenders

On the right 16th French corps send their infantry to attack the hill, their artillery and the reserve cavalry will prevent the Russians in the centre from delaying this advance. However when they reach the hill the Russian infantry put up a strong resistance. After two rounds of firefight neither side have inflicted any casualties. On move 11 the French roll 2 sixes and 1 five, inflicting three casualties on the Russian infantry. Two brigades rout, but the arrival of the Russian grenadier brigade halt any further advance. At nightfall there are four French and two Russian brigades still exchanging fire.

At the start of move 10 the Russians in the woods in the centre withdraw having received 10% casualties from French gunners. French infantry enter the woods, but receive similar casualties from Russian artillery. Russian infantry counter attack, but lose the firefight and rout into their reserves. On move 12 the French secure the woods.

It is move 10 before the Vistula corps is finally in position to attack the farm on the left. Their artillery force the garrison to withdraw, the their infantry follow up. The Russian infantry counter attack, but lose the melee and retreat shaken. Russian cavalry charge the French guns, but are routed with 10% casualties. The French secure the farm.

Mainly due to good French dice, and poor Russian ones, the game is decided in the last two moves. It is a clear French victory, but one mostly due to luck.

Comments

This was a very enjoyable wargame in which either side could easily have won. The French would not commit to an attack without first weakening the Russian defenders. However all early attempts to do so failed.

It was typical that it took three rounds to decide the fire fight on the hill on the left. The French infantry were better quality musket and skirmish, but failed to cause any casualties for two moves. The Russians were poor quality conscripts, and out of six dice rolled failed to achieve one six which was required for a hit. However on the third round the French rolled two sixes and one five, all causing casualties.

It can be very frustrating when your opponent rolls a six at the critical point of the game, causing casualties. And even more so when you roll a one or two for morale. But it does result in a clear and decisive outcome, which we both like. Fortunately the good and bad luck are usually fairly evenly spread between the two armies.

Sunday, 11 August 2024

Halle Campaign – Day Two

Campaign Map

French attack Eisleben
4 French army – occupy Mansfeld
5 French army – attack Eisleben
6 French army – hold and resupply

Russian retreat to Konnern
1 Russian army – retreat to Konnern
2 Russian army – defend Eisleben
3 Russian army – move up to border

Battle of Eisleben – Move 2

The Russians are more prepared than on day one
4 and 6 corps have orders to move forward, and do so at the start of move 1

All three French corps arrive on the table at the start of move 1
Once more there is a hill on the right, which will delay that attack considerably

The Russians occupy all three game objectives in the centre of the table

Once more the French CinC take command of artillery from two corps
The main French attack is against the woods in the centre.
14th French corps is supported by the grand battery
Their cavalry rout the cossacks, which leaves a gap in the centre
As the French infantry advance into that gap, the cavalry rout an infantry brigade
The centre is broken, which forces 6th corps to retreat
As soon as the French take the woods and fortified farm they halt the attack

Both generals have fought a very cautious battle, to avoid unnecessary casualties

French have lost 1 cavalry casualty (100 men)
Russians have lost 2 infantry, 1 cavalry and 1 artillery casualties (1000 men)

Comments

The table is very similar to Mansfeld, but the Russians react much quicker. Warned of the French offensive by the battle of the previous day, both reserve corps have orders to move forward on move 1. Consequently they are in position long before the French can reach any of the game objectives.

The French tactics are very similar to the previous day. Once more the CinC takes command of artillery from two corps, to create a grand battery. This is used to support the attack on the centre, and as soon as they open fire the Russian infantry withdraw from the woods.

However it is the performance of 14th corps dragoon brigade which makes the critical difference. On move two they are charged by Russian cossacks, and retreat shaken without a melee. They quickly rally and rout the same cossacks. The nearest Russian infantry join the cavalry rout, leaving a gap in the centre. The French infantry quickly move into that gap and the dragoons rally and charge a grenadier brigade in support of the fortified farm. They rout and take the nearby gunners with them.

The Russian centre and left retreat to the town, abandoning two of the three game objectives. It is an easy victory for the French.

It was interesting that a poor dice delayed the attack in the centre, but a series of very good dice resulted in the destruction of the Russian centre. The low casualties would seem to indicate a lack of will on the Russian side. But in fact the loss of both cavalry, artillery and infantry in the centre meant that they had no choice. Any delay would have resulted in heavy Russian casualties, and a rout rather than an organised withdrawal to a strong second position.

Sunday, 4 August 2024

Halle Campaign – Day One

Campaign Map


French attack Mansfeld
4 French army – attack Mansfeld
5 French army – hold and resupply
6 French army – hold and resupply

Russian
1 Russian army – defend Mansfeld
2 Russian army – hold and resupply
3 Russian army – hold and resupply
Battle of Mansfield – Move 2

The campaign opens with a surprise French attack on the border town of Mansfield.

1st Russian army has one corps between the town and the border, their task is to observe the border and warn of any French movements. The CinC is in the town, with the other two corps either side of the town. It will take one move to inform the CinC and a further move to activate the two reserve corps. They will not move until the start of move 3.

10th French army arrive on the table at the start of move 1. The photograph shows their position at the end of move 2, just before the reserve Russian corps start to move.

2nd Russian corps put up a hard fight for the woods in the centre, including a determined counter attack. But the French beat them off and held the woods at nightfall.

10th French (young guard) corps were delayed by having to move over the hill on the right. This allowed 1st Russian corps to occupy the fortified farm before they could reach it. Marshal Davout combined the artillery from 10th and 11th corps, and supported the attack on the farm. The Russians were driven from the farm and forced to retreat behind the woods on the right.

3rd Russian and 12th French corps arrived at the hill on the left at the same time. Cavalry can cross a hill at half speed, but may not fight on it. Artillery can fire from the edge, but not redeploy. So the battle for the hill was an infantry one. The French had an initial advantage and the melee continued for three moves, but the elite Russian grenadier brigade finally drove off the French and held the hill at the end of the game.

Having taken two of the game objectives the French won the battle.

Comments

The delayed arrival of two of the three Russian corps worked really well, particularly on the right left where the infantry slogged it out for three moves. The Russian grenadier brigade arrived late, but turned the tide and secured the hill.

The battle in the centre was evenly balanced. The woods is relatively small, and could only hold one brigade. The French attack was supported by the grand battery, which allowed them to take the woods. But the area between the woods and the hill on the left was strongly held. The French had to advance to the right of the woods, however they were able to drive off the Russian counter attack on the woods.

10th young guard corps should have played a major role in the battle. However they had to advance over the hill on the right, and had to move at half rate until they had cleared the hill. So it was half way through the battle before they reached the fortified farm. Fortunately they were supported by the French grand battery, who forced the garrison to withdraw from the farm. Despite their late arrival they forced all of 1st Russian corps to withdraw behind the woods.

A very enjoyable first game.

Sunday, 28 July 2024

Halle Campaign in Central Germany


Campaign map of Germany

There are three campaign areas in Germany
In the north First French Army Group and the Prussian army
In the centre Second French Army Group and the Russian army
In the south Third French Army Group and the Austrian army
This is the eleventh campaign phase to be fought in Germany

Campaign map of central Germany

There are three regions in central Germany
Dusseldorf region is the reserve area for Second French Army Group
Dresden region is the reserve area for the Russian army
The campaign is fought in Erfurt region

There are nine districts in Erfurt region, each one a campaign phase
The area from Nordhausen district to Halle district is the campaign area for this phase
Campaign map for Halle phase

This map is used for campaign movement and resupply
It shows the location of the nine French and nine Russian corps
It also shows the movement of supply columns.
There are 12 towns on the map and each one is a possible battle/wargame
Each town has 9 squares, and each one is a scenic square on the wargames table


Example of a Russian corps

Wittgenstein has nine corps under his command, all are Russian. All nine corps have four infantry brigades, one cavalry brigade and corps artillery. Russian artillery are more powerful than the French, but their cavalry weaker.


Example of a French corps

Davout also has nine corps under his command. There is one young guard corps, five French corps and one Polish, Italian and Vistula. The non French corps have more conscript troops than the French ones.

Comments

I always think of central Germany as the least interesting of the five campaign areas. In north Germany there is Napoleon and the Imperial Garde. In south Germany the very colourful Bavarian and Austrian armies. In North Spain Wellington with British, Portuguese and Spanish corps. In south Spain the colourful, but not very effective, Spanish army, plus of course the bands of irregular guerrillas. By comparison there are the all green uniforms of the Russians and the equally uninspiring blue of the French.

However once the campaign starts this superficial view is quickly forgotten. Once on the wargame table the large number of troops is impressive, and the tactical problems of attack and defence renders all else secondary.

We start the new campaign during the hottest part of the year here in Spain. With temperatures of 34 to 40c we have to suspend our normal weekly walking group, and our whole daily routine changes dramatically. We get up early most at 0700 so that we can do an hour’s walk. That leaves us another hour to do our outdoor tasks, and finish by 0900. It is too hot to attempt much outdoors for the remainder of the day. So our Wargaming becomes more important than ever. We are fortunate to have a permanent wargames room which is the coolest part of the house and we spent an hour or so gaming most days.

I also tend to spend more time working on the campaign than during the rest of the year. I often have a special summer project, and this year is no different. I am updating all of the wargame maps, which keeps me busy for a couple of hours each day. I will post an update on the blog when I have something to show.