Sunday 29 March 2009

Campaign movement

Introduction

I have five campaigns on the go at present. However I will only use one to illustrate campaign movement. I will use the campaign in northern Germany, as I have already used the maps for this campaign in earlier posts.

The campaign is loosely based on 1813. The aim is not to recreate the historical campaign, it is to provide a campaign setting which will produce the size and type of wargames I wish to play.

The campaign area is from Osnabruck to Berlin. The Second French army, consisting of 4 corps, have orders to hold the river Elbe from Hamburg to Madgeburg. The Prussian Army, also consisting of 4 corps, have orders to advance from Berlin and capture Madgeburg.

In order to reduce paperwork to a minimum I only keep a hard copy of the Strategic and Tactical maps in the campaign folder. All orders are controlled on the computer.


Maps and markers

The map is drawn on a sheet of A4 paper, which is then placed inside a transparent A4 folder. In my example there are five markers each side, red are allied and blue French. Four markers represent the four corps on each side, the fifth is the Army HQ. I stick a blob of bluetac on the back of each marker, and they can be moved around the map without doing any damage.

Strategic movement

The campaign starts on 1 May when the Prussians start their advance from Berlin to Madgeburg. Orders, which are very simple, are written before any movement. Prussians move first, French can not react until the following day. Movement rate is 1 square per day. Maps indicate position at end of each day.


Strategic map 1 May 1813

Second French army is deployed to hold the river Elbe from Hamburg to Madgeburg
The Prussian army has started its advance from Berlin to the river Elbe


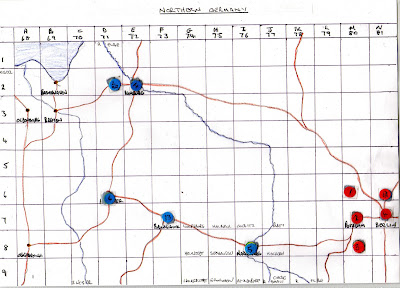
Prussian Army - move to river Elbe and occupy Madgeburg
1 Prussian corps - move to M6
2 Prussian corps - move to M7
3 Prussian corps - move to M8
4 Prussian corps - move to N7
Second French Army - Hold line of river Elbe from Hamburg to Madgeburg
4 French corps - hold Hamburg
5 French corps - hold Madgeburg
6 French corps - hold Hannover
13 Polish corps - hold Brunswick


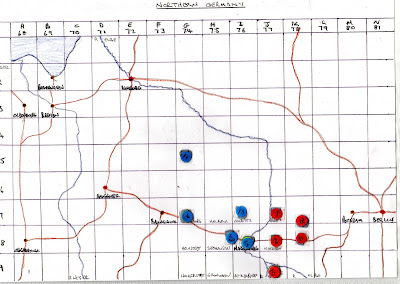
Strategic map 4 May 1813

Second French army is moving towards the river Elbe
Prussian army has reached the river Elbe and is about to cross
Prussian army - move to river Elbe and occupy Madgeburg
1 Prussian corps - move to J7
2 Prussian corps - move to J8
3 Prussian corps - move to J9
4 Prussian corps - move to K8
Second French army - hold river Elbe from Hamburg to Madgeburg
4 French corps - move to G5
5 French corps - hold Madgeburg
6 French corps - move to G7
13 Polish corps - hold I7


Tactical Movement 4 May 1813

Because the two armies are now within three strategic squares of each other, and neither are prepared to retreat, the first Tactical map is now made. It covers the 12 Strategic squares 74-7, 74-8, 74-9, 75-7, 75-8, 75-9, 76-7, 76-8, 76-9, 77-7, 77-8 and 77-9. Only the corps on those squares on the Strategic map are transferred to the Tactical map

Tactical Map 4 May 1816
Second French army is moving towards the river Elbe
Prussian army has reached the river Elbe, 3 corps has already crossed the river in the south

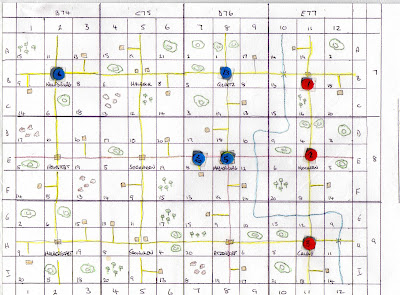
1 Prussian corps - move to B11

2 Prussian corps - move to E11

3 Prussian corps - move to H11

5 French corps - hold Madgeburg

6 French corps - move to B2

13 Polish corps - move to B8

Tactical Map 8 May
Second French army is moving south towards Groningen to halt Prussian advance
Prussian army has crossed the river Elbe at Calbe and is about to attack Groningen


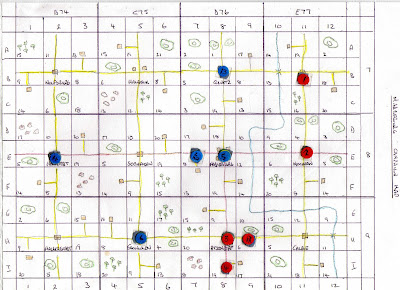
Prussian HQ - Atzendorf
1 Prussian corps - hold B11
2 Prussian corps - hold E11
3 Prussian corps - move to H8
4 Prussian corps - move to I8
French HQ - Madgeburg
4 French corps - move to E2
5 French corps - hold E8
6 French corps - move to H5
13 Polish corps - hold B8

What happens next?
3 and 4 Prussian corps are about to attack 6 French corps at Groningen. The wargames table will be set up with a 3x3 square centered on Groningen, figures will be placed on the table in the squares shown on the tactical map. 4 French corps will arrive in square G4 on move 8.
Before the wargame is fought, orders will be written for all corps not taking part in the battle for 9 May 1813.
When the wargame ends, final positions on the table will be transferred to the Tactical map and orders written for the corps taking part for 9 May 1813.

Saturday 28 March 2009

Campaigns Tactical maps

What are the tactical maps for?

These maps are designed to transfer the strategic movement of the various corps and armies to the wargames table. They should also make maximum use of my wargames scenery. It was also important that they should not require too much paperwork or administration.

My wargames table

My table is 6' x 6'. The scenery consists of 21 MDF boards, each 2' x 2'. Therefore the whole table would have 9 squares. I have made 21 scenic boards, and those not in use are stored under the table. This photo shows the table prior to the deployment of the armies.


The scenery boards

All are painted green. There are 7 boards with hills. The remaining 14 have roads or rivers pained on them, or are blank. Both sides are painted to represent different scenery. Therefore there are 35 different scenery sections. Each board is numbered for each of reference.


Top face of each board


Bottom face of each board


Making the tactical map

The tactical map has 108 squares, each representing a scenery board. Each square has a number for ease of reference. Therefore each 3 x 3 represents one square on the strategic map. The tactical map covers the same area as 4 x 3 squares on the strategic map.

When two armies come within 4 squares on the strategic map, and both continue to advance, I make a tactical map to show the area in more detail. I research the type of terrain from the original road map, historical maps and Google Earth. However it is not meant to be a copy of the actual ground, but rather to provide an interesting wargame.

There are four corps on each side in each campaign. Only one corps may occupy each strategic square, and only one corps may occupy each tactical square. When two opposing corps come within 4 squares of each other on the tactical map the wargames table is prepared and fighting takes place. After the battle the results are transferred back to the tactical map.

If one side makes a tactical withdrawal, as opposed to a rout, the battle can continue, as the map is a rolling one.

Each wargame lasts 12 moves. Therefore each square on the tactical map represents 4 game moves. This allows me to bring on reinforcements during the game, and can also provide for tactical off table moves.

I have made 2" square cards to show each of the possible 35 scenery boards. Using these I make a plan of the tactical map. Care is taken to ensure that no scenery board is used twice within 3 squares.

There is a reference grid on each map. This is to identify the square in the strategic map, but there is also a new reference for each square, 1 to 12 along the top and A to I down the side. For example Madgeburg would be E8.


Campaign Strategic maps

having read my previous post, I realise how complicated it all sounds. Actually its quite simple, and I thought a step by step guide, with illustrations, might help.
Step One - Get a Road Map
The larger the campaign area, the more work involved. But the principle involved is the same for one small country or the whole world! I wanted to cover the whole of Europe for my Campaign area. It should include France, modern Germany, Austria, Italy, Spain and Portugal. So the ideal basic Road Map for me was a copy of the AA Road Atlas of Europe.
The only problem with a modern road map is that it provides too much information. Its main aim is to show the current road system. However it also shows major rivers and is shaded to show mountain ranges. Each page shows the adjoining pages, making it easy to create a single map of the whole of Europe. The only thing I changed at this stage was to highlight rivers, as they do not stand out very well.

Step Two - Make Photocopies of the area required
There are three reasons for this. First I wanted to make A4 size pages of the maps. Second I wanted to highlight the roads, rivers, national boundaries, mountain ranges and important cities and towns. Third I wanted to impose a new grid so to make it easy to find adjacent pages. I decided to use the modern motorway system as my major road system. Minor roads would play no part in the campaign.


Step Three - Create a hand drawn map of each road map page
This is the most time consuming part of the process. But once done it provides a basic, uncluttered map of your campaign area. This map has the same grid reference as the previous map. This is so that you can refer to the detailed road map for each square when required. If you require further information you could also find the area on Google Earth.

Step Four - Create a hand drawn map of the actual campaign area
It is likely that to cover the required campaign area, say from Berlin to Hamburg, a number of the previous maps would be required. So I make a special map for each campaign area. Again it is A4 size, and covers an area of 280 x 200 miles. Each square on this map is 20 x 20 miles, and I use this as one days march for campaign purposes. I realise that this is rather slow movement, but allows for rest days etc. The grid is the same as for previous maps, but in addition the top line is marked A to N, this is so that the grid reference for each square is a letter and a number, for example Berlin would be N7. All corps and army movement is done on this map.

In my next post I will explain how the action is transferred from the Strategic Map to the Tactical Map, which shows the actual wargame tables.


Friday 27 March 2009

Making a campaign map

Since my last post I have completely reorganised my approach to wargaming. As we play so often, I need a simple way to produce new games. I have tried various types of campaign, but all were too complicated, and required much too much paperwork.

I decided to go back to first principles. I wanted a campaign which would allow me to use all of my wargame figures, and all of my scenery. It must also provide battles which would fit on my 6' x 6' wargames table.

I bought a road map book of Europe. I photocopied each page, and highlighted the motorways as main supply routes. I also highlighted major rivers. I then shaded mountain and forrest areas. Finally I divided each page into 1" squares. Each page was 280 x 200 miles, and each square 10 x 10 miles. This meant that my campaign map would at least have major towns, rivers and mountain ranges in correct relation to each other.

I then drew each of these pages on A4 pages, which were gridded with 20mm x 20mm squares. I did this to give me more squares per page than 1" x 1" would have done. These were numbered across the top of the page, and down the side. This gave me a grid for the whole of Europe. I transferred main cities and towns of the Napoleonic period, main supply routes and rivers. These maps were now my Strategic Maps for the campaign, on which the various corps and armies would march to war.

But how to produce wargame tables? A new series of maps would be needed.

My wargame table is 6' x 6'. My scenery consists of 2' x 2' MDF squares, on which I have modelled simple hills and drawn roads and rivers. There are 20 wooden squares, and those which do not have hills have different combinations of roads and rivers on each side. There are 6 hill sections, so there are 14 double sided sections with roads and rivers. This gives me 34 different options. More than enough to give me a wide selection of possible wargame tables. The scenery has been kept simple to allow me to use every inch of the table without model soldiers falling over. The roads and rivers are suitable for both 28mm and 15mm figures.
Each of the scenery squares are numbered (1 to 20). Those not in use on the table are stored underneath.

My second set of maps would be Tactical Maps. Again I used A4 paper, and again drew 20mm x 20mm squares. Each square would represent one of my 2' x 2' scenery squares. This A4 page would give me 12 wargame tables, three across and four down. Each wargame table would have 3 squares accross and 3 down. Each table would represent one map square on my Campaign Map.

I cut 34 card squares, each 20mm x 20mm. On each one of these I drew the outline of one scenery square. With these I planned my Tactical Map. Using the original Road Map, Strategic Map and on line maps such as Google Earth, I checked the type of scenery on each square, whether it was cultivated, hilly, had rivers or woods. I used the card squares to recreate a wargames table based on this information and, when happy with the result, drew this on my Tactical Map. I made sure that no piece of scenery was ever used twice within 3 squares, and in this way I now had a map covering an area of 30 miles by 30 miles with rolling scenery squares. Each wargames table (that is 3 x 3 squares) had a town or village.

So how did it all work. I will cover that in my next posting.