Showing posts with label 73 - 1813 Campaign - 2022. Show all posts

Sunday, 11 December 2022

End of Goslar Campaign


Goslar Campaign Area

There were six battles fought, the Prussians won four and the French just two.


The campaign objective, the city of Goslar, was held by the French throughout the campaign.  

But by the end of the campaign Blucher has taken Osterode and routed Third French Army and outnumbered the French three to two.

Brunswick Region

There have been three campaigns in the Brunswick Region since the Sixth Campaign began

in September 2020.  

The French won two and the Prussians just one.

Of the 17 battles fought the French won ten and the Prussians seven

Europe

Since the 1813 campaign began in April 2009 there have been 16 campaign phases fought in Northern Europe between Napoleon and Blucher.  

The French won eight and the Prussians also eight.


Comments

At first sight this campaign, which began two years ago, was unusual in that Napoleon was beaten by Blucher.

In this current campaign the French beat the Prussians two campaigns to one

They also won ten battles and the Prussians only seven


However throughout the whole 1813 campaign, which began 13 years ago, both sides won 8 phases.


The French have the Imperial Garde corps, which has better quality troops than any of the Prussians corps

However when both armies are compared the number of elite brigades is similar.


One of my objectives in planning the 1813 campaign was that both sides should be equal

The campaign is designed to provide interesting battles to wargame.

So it was important that formations like the Imperial Garde should not win every battle

It would be possible, but a lot of work, to determine how many of their battles they did in fact win

But the fact that the French and Prussians each won eight phases seems to indicate that  I was reasonably successful.

Sunday, 4 December 2022

Goslar Campaign Day 7


7 June 1813 – Northern Germany – Day 7


French retreat and abandon Goslar and Liebenburg

In the north French abandon Liebenburg

In the centre French abandon Goslar

In the south Prussians occupy Osterode

Prussians win Goslar campaign


Comment


Before the battle of Osterode things were looking bleak for Napoleon.

However he still held the three western towns of Leibenburg, Goslar and Osterode.

Both armies were weary after six days of hard fighting

However the French had taken the brunt of the damage.


Murat’s report made it clear that he had suffered a dramatic defeat at Osterode

Half of Third Army was in rout, the remainder in retreat.


Napoleon issued orders for First Army to hold Goslar and Second Army Liebenburg

Murat was to rally west of Osterode and prepare to counter attack


However on the morning of 7 June he received reports that the entire Prussian army was advancing

Blucher ignored his low supplies and heavy battle casualties

He could clearly see that one more push would force Napoleon to retreat

At first light he led his entire army west towards Goslar


Even Napoleon now had to admit defeat

His army was outnumbered three to two

His right flank had routed

If he tried to fight again he would almost certainly lose the entire French Army of the North

He ordered a general retreat and abandoned Goslar and Liebenburg


The Prussians had won the Goslar campaign.


Sunday, 27 November 2022

Goslar Campaign Day 6


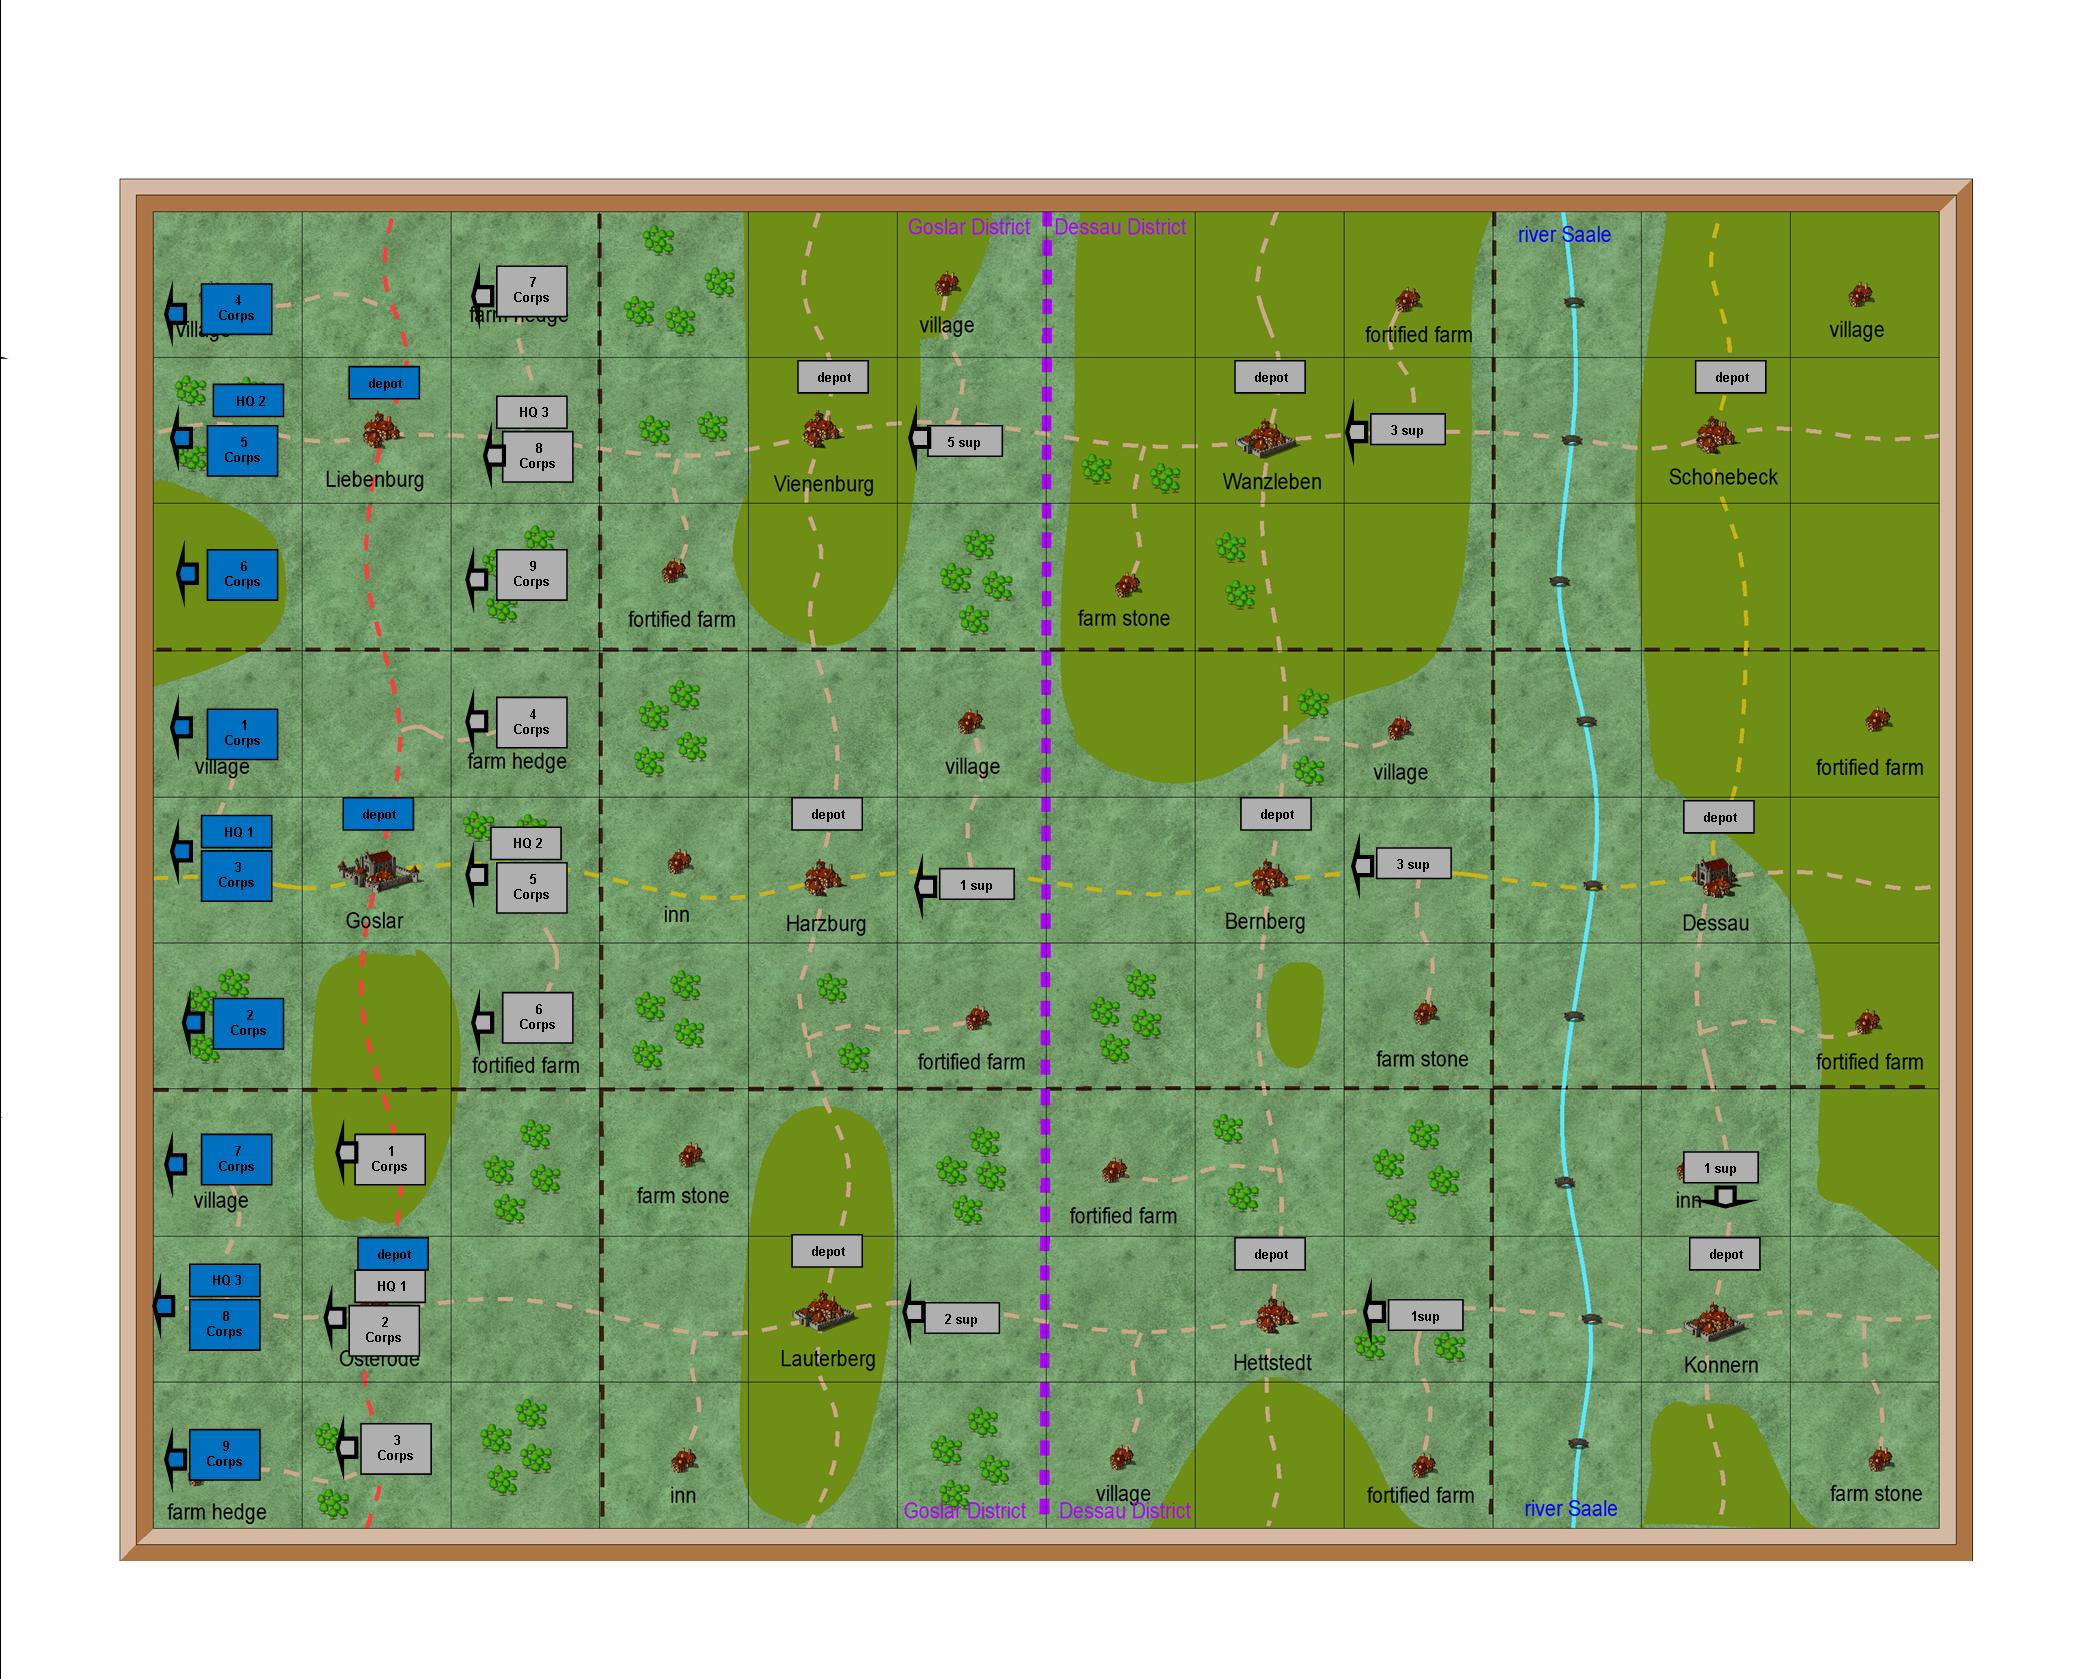
6 June 1813 – Northern Germany – Day 6

Prussians attack Osterode

In the north both armies rest and reorganise

In the centre French retreat to Goslar

In the south Prussians attack Osterode

Battle of Osterode – Move 10

The battle opened with the French deployed just in front of Osterode

As the Prussians entered the table the French occupied the woods on either flank

However they held their centre back

This proved a mistake, because the Prussians could outflank the woods


The Prussians lost the first cavalry melee on their right

This forced them to hold back their attack on the woods

Only when the French started to retreat did 1st corps advance


On the opposite flank they had more success

Here the cavalry melee was a draw, and both brigades withdrew

The Prussian infantry and artillery pressed home their attack on the woods

Fighting continued until nightfall, but the French suffered more casualties


The Main attack was in the centre.  

Kleist took the grenadier brigade from each corps to form the main attack

Supported by 2nd corps he managed to break the French centre

This forces both flanks to withdraw and gave him a convincing victory


Comment

In this campaign it would appear that the French can do no right

Despite having the Imperial Garde and Napoleon in command


This game was decided within two moves

The French had woods on both flanks, with open ground in the centre

They could deploy behind the woods, half way in or hold the whole woods

They decided on the latter, but left their centre where it started the game


The woods are a strong point, but they are difficult to defend

Prussian artillery could approach within short range of the woods

They could then blast the forward infantry brigade in the woods


To counter this the French cavalry had to be brought forward

This would deter the Prussian gunners from getting too near the woods

But it would then present the Prussian gunners with the cavalry for a target


As always the initiative is with the attacker

He can take advantage of any deployment error

The commander can also take brigades from the three corps

This strong reserve can then be directed at the weak part of the defence.


During this campaign I have usually been the attacker

This is because Jan prefers to react

I have found that the opening moves are where the attacker is most vulnerable

He must advance into artillery range of the defender, and in doing so accept first fire

If he loses either cavalry or artillery, it becomes almost impossible to attack.


He has two or three moves to fire on the enemy

If he takes longer he will arrive too late to take the objective

If his guns do not cause damage to the defenders he must risk his cavalry

Unless he can weaken the enemy guns he will probably take heavy infantry casualties

This will usually result in an early cavalry melee


Cavalry melee will usually result in both sides taking casualties

This will weaken both brigades, who then usually retreat behind the infantry

If the defender wins the cavalry melee it will be very difficult for the attacking infantry to advance.


The advantage of my new three corps per side is that each corps has its own cavalry

It is most unlikely that one side will win all three cavalry melee

The attacker will usually win at least one melee

He can then use his reserve to support the winning side


This makes for an interesting wargame

The attacker must hold his reserve in the centre

From here he can support whichever wing wins the cavalry melee


His greatest problem is to force a break through early enough to reach the objective

This has proved the most difficult thing to achieve in this campaign

It has often resulted in the defender holding the objective at nightfall

However to do so he has lost more casualties than the attacker

But by holding the objective he has won the game.


This should result in a second day of battle

But that is usually a very boring wargame

The stronger attacker can redeploy overnight

Within three or four moves he will have broken the weaker defender

I usually avoid this outcome by having the weaker defender retreat overnight.

Sunday, 20 November 2022

Goslar Campaign Day 5


5 June 1813 – Northern Germany – Day 5

French attack Harzburg

In the north surprise French attack on Harzburg

In the centre French prepare Liebenburg for a siege

In the south both armies regroup and resupply

Second battle of Harzburg Move 12

The French plan was to pin the Prussian left

The main attack would be in the centre against Harzburg

The Guard would crush the Prussian right and support the centre

The Prussians put up a fierce resistance and held their centre and left

Their right was broken, but delayed the Guard until it was too late to take the town

At nightfall they still held Harzburg and won the battle


Comment

The situation is becoming desperate for the French

The Prussian army has crossed into Goslar district and is poised to take Goslar itself.

Fortunately the city is defended by 1st French army, including the 1st Guard corps.


Napoleon orders 1st army to attack 2nd Prussian army at Harzburg

The aim is to break the Prussian centre, or at least disrupt their plans to attack Goslar.


The attack quickly becomes bogged down.

On the right 3rd corps are quickly repulsed and only just hold the flank

The main attack in the centre is a dismal failure, including the reserve commanded by Napoleon

But on the left the Imperial Garde brush aside 4th Prussian corps and attack the city

Unfortunately the run out of time and the Prussians still hole Harzburg at nightfall.


I commanded the French, and it was a real pleasure to see the Imperial Garde on the table

The dice rolled well for them, and allowed them to crush the Prussians as you would expect them to do

However it was only fair that they failed to take Harzburg

For Jan, who commanded the Prussians, defeated two thirds of the French army

And without doubt deserved to win the game.


I am really pleased with the type of game provided by the larger armies

In effect there are three games being fought at the same time

And it is most unlikely that one side will win all three

Often the game is won by the side who win the centre of the three battles

They can then move to support whichever flank is having the most success

However, as in this case, it is often too late to take the objective within the 12 moves allowed.

Sunday, 6 November 2022

Goslar Campaign Day 4


4 June 1813 – Northern Germany – Day 4

Prussians attack Liebenburg

In the north Prussians attack Liebenburg

In the centre both armies resupply and reorganise

In the south Prussians enter Lauterberg, French retreat to Osterod

The battle of Lauterberg – end of move 12

The Prussians were unlucky to have lost this battle

They took the woods on the left and routed 6th French corps

The CinC reinforced 8th corps for the main attack in the centre

They took heavy casualties on the right, but managed to support the attack in the centre

But they lost the critical infantry melee in the centre and failed to take the town

The French lost 9 infantry, 4 cavalry and 2 artillery casualties (4200 men)

The Prussians lost 10 infantry and 7 cavalry casualties (4100 men)

The French has 8 brigades in rout, the Prussians 7 brigades.

The Prussians failed to take the town and lost the battle


Comment

The very busy, and complicated, photo of the end of the game tells the story

Blue stars are French brigades in rout

Grey stars are Prussians brigades in rout

White stars are the critical infantry melee


The Prussians broke and routed 6th French corps on the left

They then swung right through the woods towards the centre


They lost the battle on the right, but managed to advance when the French redeployed


The Prussian attack in the centre was well supported by cavalry and artillery

They routed the French cavalry, but caused too few casualties to the infantry in the centre

Despite this the Prussian infantry attack outnumbered the French infantry defending

However the dice were against them


It was a very complicated and very tense wargame

Everything went well for the Prussians and it seemed like their attack in the centre would succeed

The final melee was three Prussian against two French infantry brigades

The French were in line and the Prussians in column

The Prussians had the edge, but not the luck of the dice.


Both armies suffered heavy casualties

Both would need to regroup and redeploy before they could commence fighting

This would allow the French to concentrate in and around Leibenburg.


We enjoyed this game so much that we played it twice

The first time the Prussians won, the second they lost

A final dice throw decided which game would be recorded for the campaign.


Sunday, 23 October 2022

Goslar Campaign Day 3


3 June 1813 – Northern Germany – Day 3

Prussians attack Lauterberg

In the north both armies regroup and resupply

In the centre French retreat to Goslar, Prussians occupy Hartzburg

In the south Prussians attack Lauterberg


The battle of Lauterberg – end of move 12

All three Prussian corps attack

On the right the French counter attack and drive them back into the woods

In the centre 2nd corps take the left half of the town

The reserve of 2 infantry, 2 artillery and 1 cavalry brigade, fail to take the right half

On the left 3rd corps break and rout 9th Polish corps.

At nightfall the French hold half of the town and claim a victory

However they have lost more casualties and will have to retreat during the night


Comment

The larger armies result in a more complex wargame

Each of the three corps on either side fight an independent battle

Both commanders create a reserve to tip the balance.


1st Prussian corps lost the battle on the right

2nd Prussian corps took half of the town in the centre, but were unable to take all of it

3rd Prussian corps won the battle on the left

The French won because they held half of the town at nightfall


Except on their left, the French fought a defensive battle

The Prussian reserve artillery had to support their losing left flank

This prevented them from supporting the main attack on the town

When the Prussian right was stabilised, the artillery were in the wrong place.


The French withdrew their artillery on the right of the town

But they were still able to prevent the Prussians attacking the right of the town

This allowed them to hold half of the town until nightfall


The Prussians won the battle on the left

The whole Polish corps was broken and routed

But 3rd corps were too far away to support the attack on the town


An interesting and quite complicated battle

It highlighted many of the problems raised by the larger three corps per side armies


The attacker has to spread his army across the whole table

He must then create a reserve to reinforce whichever of his three corps have the most success

However it can be quite late in the 12 hour/move day when it becomes which corps that is

And almost certainly some of his army will be in the wrong place at the end of the game


This feels like a realistic result.  

Once a corps has been committed to attack, it could not be suddenly redeployed to meet an unexpected setback

This happens a lot in wargames, but almost never in real life

It makes the creation of a reserve essential, as it was again in real life

And if the reserve could also only be committed once

If, as in this case, it was used to restore a setback on the right it could not also be used in the centre


After three battles the new larger three corps armies are providing different and interesting tactical problems

This was the intention, so well pleased with the results so far.

Sunday, 16 October 2022

Goslar Campaign Day 2


2 June 1813 – Northern Germany – Day 2

Prussians attack Harzburg

In the north French retreat and Prussians occupy Vienenburg

In the centre Prussians attack Harzburg

In the south French advance towards border

The battle of Harzburg – end of move 12

Prussians ignore the flanks and attack the town

French fight a defensive battle to take advantage of their strong position

This allows the Prussian artillery to deploy at close range and batter the town defenders

Just before nightfall the infantry attack and rout the garrison.


Comment

The French really should have won this battle.


Napoleon commanded the 1st French army, and it included the 1st Old Guard corps.

Jan was so confident of success that she decided on a defensive battle

Napoleon commanded a small reserve of one infantry and one cavalry brigade

The town was strongly held, and the flanks would deploy level with the town

The Prussians would be bombarded as they advanced

It was not anticipated that the French would need to counter attack


As Prussian commander I created a strong reserve of 2 artillery and two elite infantry brigades

This was placed to the left of the main road in the centre, and would be the main attack force

On the right 4th corps would take a defensive position and pin the French left

In the centre the weakened 5th corps would support the attack on the town

On the left 6th corps would take the farm and pin the French right


All went well until the end of move 10.


On both flanks fighting was restricted to cavalry engagements and artillery fire


By move 6 the Prussian reserve artillery was firing on the garrison at short range

The French artillery on the flanks quickly concentrated on the Prussian gunners

But most of this artillery fire was very ineffective.


During move 11 both French garrisons received 10% casualties, but passed their morale test

On move 12 they again received 10% casualties, both failed their morale test and were shaken

The waiting Prussian infantry stormed the town during the last move of the game

The shaken garrison both routed, and took the supporting brigades behind the town with them


The French decision to fight a defensive battle was a sound one, and it should have worked

The town was held by two elite infantry brigades, one in each half of the town

They were supported by two conscript brigades behind the town

The flanks were strongly held, and suffered little during the battle


The flaw was relying on conscript brigades in support to counter attack if necessary

This was a risk which had to be taken, because better reserve would have weakened the flanks

It was just bad luck that at the critical moment the dice throw caused the conscripts to rout

Sunday, 9 October 2022

Goslar Campaign Day 1


1 June 1813 – North Germany - Day 1

The campaign opens with a surprise attack on Vienenburg

In the north 3rd Prussian army attack 2nd French army at Vienenburg

In the centre both armies resupply

In the south both armies resupply

The battle of Vienenburg – end of move 2

The French occupied the town, but not the hills on either side

The Prussians entered the table at the start of move 1

There was a race for the hills, which the French won


The battle opened with cavalry melee along the whole front

The French had some success, but were eventually all routed


The Prussian cavalry and artillery then concentrated on the French gunners

They were deployed in front of the town, but vulnerable without infantry or cavalry support

As the Prussian cavalry prepared to charge the French gunners withdrew into the town

This allowed the Prussian artillery to advance and unlimber at short range of the town


Meanwhile the Prussian infantry attacked the hills either side of the town

Three brigades were routed, but the Prussian cavalry then supported their infantry]

This forced the French infantry to form square, which were broken by Prussian columns


With the loss of both hills, and Prussian artillery at close range, the French garrison withdrew

Prussian infantry were then able to occupy the town unopposed


A convincing Prussian victory


Comment


This was the first wargame with the larger three corps armies on each side.

You will see from the photo above that one corps occupied each scenic square

The French CinC formed a grand battery of the guns from all three corps in front of the town


The Prussians did not arrive on the table until the start of move one

Both Prussians and French were the same distance from the hills either side of the town

This resulted in a race to occupy the hills, which the French won


The Prussian CinC took command of half of 8th corps, plus artillery from 9th corps

He sent the guns forward to engage the French gunners

But both his infantry, and 8th corps, remained outside the range of the French artillery


7th and 8th Prussian corps advanced to attack the hills

The cavalry covered this advance, and were quickly engaged by the French cavalry

After a prolonged melee the Prussians won and the French horsemen routed

This allowed the Prussian cavalry and artillery to concentrate on the French gunners

When they withdrew their guns into the town the Prussians could attack the centre


But first there was hard infantry fighting for possession of the hills

The French soon had the upper hand, and it looked likely that both attacks would fail

But as the gunners withdrew, the Prussian cavalry moved to support their infantry

This forced the French infantry to form square, and they were no match for the columns


The battle ended in a convincing Prussian victory.

However a closer look at the casualties will show just how close it was

The French have lost 7 infantry and 4 cavalry casualties (3200 men)

The Prussians have lost 7 infantry, 3 cavalry and 1 artillery casualties (3200 men)


A very different wargame with three corps per side slogging it out

Had the French not lost all of their cavalry it would have been very different

The French gunners would have dominated the centre

The French infantry would have held both hills

The Prussians would have lost the battle.


Sunday, 25 September 2022

End of Kufstein Campaign


30 May 1813 – Southern Germany – Day 10

Schwarzenberg orders his army to retreat back into Salzburg District

1st army abandon Walchsee and take all supplies with them to Nussdorf

2nd army abandon Sankt Johann and take all supplies with them to Inzell

3rd army abandon Kitzbuhel and take all supplies with them to Schonau


Massena orders a cautious pursuit to occupy the three abandoned towns

7th army occupy, but do not advance beyond, Walchsee

8th army occupy, but do not advance beyond, Sankt Johann

9th army occupy, but do not advance beyond, Kitzbuhel

Location of battles fought during Campaign

There were seven battles fought and the French claimed four

This is because they held the town at the end of the battle

However in at least two of those battles the Austrians defeated them

But they then has to retreat due to supply problems


Comment

The three battles the Austrians won were the first three of the campaign

At this time they were close to their main supply depot at Salzburg

It was only when they advanced and lengthened their lines of supply that they ran into trouble


After seven battles both armies had suffered heavy casualties

The French/Bavarian army had suffered considerably more than the Austrians

But as they retreated they were reinforced by the garrisons of the rear area

They were also much closer to their main supply depot at Kufstein


Had Schwarzenberg fought a second day of battle at Kufstein he might well have won the campaign

But at that stage his corps were running out of supplies, and in danger of attrition casualties

When a corps no longer has any supplies it has to immediately retreat until it comes within one days march of supplies

This would have thrown the whole Austrian army into disorder and could easily have led to their complete destruction

To retreat was the right decision, and was surely what the cautious Schwarzenberg would have done in real life

Had it been the French, under command of the more determined Massena, I might well have fought one last battle.

Great campaign and one which would result in major amendments to future campaign phases.

Sunday, 18 September 2022

Kufstein Campaign Day 9


29 May 1813 - Southern Germany - Day 9

Massena’s army has sufficient supplies, but also very heavy casualties

7th army resupply and reorganise at Oberaudorf

8th army rally, regroup and resupply at Kufstein

9th army resupply and reorganise at Worgl


Schwarzenberg has four of his six corps out of supply

1st army rally, resupply and regroup at Walchsee

2nd army retreat to Sankt Johann

3rd army resupply and regroup at Kitzbuhel


Comment

Schwarzenberg blinked first – but he really didn’t have any choice.


Both armies are shattered and in practical terms no longer operational.

The Bavarian/Baden army has lost more casualties, but are fully supplied

The Austrian army has suffered less, but still considerable, casualties

Most critical four of the six Austrian corps are now out of supply


1st and 2nd Austrian armies are completely out of supply

If they do not immediately rest and resupply they will start to lose casualties due to attrition

At that stage they must immediately retreat until they can resupply

3rd army is fully supplied, but being south of the river Inn is too far away to help


Today Schwarzenberg ordered 1st and 3rd armies to resupply and regroup

2nd army had to retreat to Sankt Johann due to attrition.

However this is only the start

He has accepted that to save his army he must retreat into Salzburg District to rest and regroup


This would be a perfect opportunity for Massena to pursue and smash the already broken Austrian army

However his own army have suffered so many casualties that they are no longer operational

A pursuit is out of the question until he can regroup and replenish his battle casualties


Schwarzenberg deserved to win this campaign.  

He has more operational brigades than Massena.

But no commander can ignore such a dire supply situation

If he does not retreat his army will disintergrate and he will lose everything


Sunday, 11 September 2022

Kufstein Campaign Day 8


28 May 1813 - Southern Germany - Day 8

Massena is determined to hold the line Oberaudorf-Kufstein-Worgl

7th army hold Oberaudorf

8th army defend Kufstein

9th army hold Worgl


Schwarzenberg is running short of supplies, but orders the attack on Kufstein

1st army retreat to Walchsee

2nd army attack Kufstein

3rd army hold Kitzbuhel


Battle of Kufstein – Move 2

This photo is taken at the end of move two.

The Bavarian/Baden hold a very strong defensive position in front of the city of Kufstein

Half of 12th Baden corps started the game on the left bank of the river

However they have now crossed the river to join the rest of the corps

Apart from the field army, there are also two militia brigades in garrison in Kufstein


The Austrians have entered the table and are faced with a difficult choice.

An attack on the left will be outflanked by the Bavarian reserve on the pass

An attack on the right will have to take the strong hill

An attack in the centre will have to fight its way through the pass

All three options will be very time consuming

Schwarzenberg decided to pin the left and right and drive the centre back

He would then swing his reserve to their right to outflank the hill.


The photo shows the Austrian advance.

The reserve cavalry (centre) are charged by Bavarian cavalry

4th corps cavalry join the melee and rout the enemy cavalry.


By nightfall nine Bavarian and Baden brigades are in rout

Remainder are all shaken, including the garrison of Kufstein

The Austrians have defeated the Bavarian army, but it has taken too long

The Bavarians still hold the town, and can claim a victory


The French have lost 14 infantry, 5 cavalry and 2 artillery casualties (6300 men)

The Austrians have lost 9 infantry.3 cavalry and 2 artillery casualties (4100 men)


Comment

This game was a perfect example of a delaying battle.   The Bavarians could decide whether to hold the town itself, and engage the Austrians as they approached.   Or they could opt to try to hold the major high ground in the centre of the table.  

They decided on the latter.   The weak point is the pass in the centre.   The CinC created a reserve of two infantry and one cavalry brigades to hold this area.  But he had to hold the southern end of the pass, and he had to hold the high ground on both sides of the road.

The Austrians created a similar reserve, but could choose which side of the road to concentrate their attack.  The Bavarian cavalry tried to slow down this attack, and also did so.  However the support of 4th corps cavalry turned the tide and they were routed.

The Austrian reserve now moved right and supported 3rd corps attack on the hill.    It was now just a matter of time before 11th Bavarian corps was defeated.   Too late in the day they tried to retreat, but were surrounded and crushed.

On the opposite flank it was a more even battle between 12th Baden and 4th Austrian corps.   The Austrians eventually won, but not until very late in the day.   The outcome here was less important, providing that the Baden corps were not allowed to move to support Kufstein.

The final attack on Kufstein started on move 10, against 43 brigade in the right hand section of the city.   The Bavarian reserve of two infantry brigades had redeployed between the town and the pass.   3rd Austrian corps were the only troops available to attack, and they had already lost their artillery and cavalry.  So it was down to an infantry melee just outside the city.

The Austrians won, and two brigades attacked the town on move 12, just as night fell.   The garrison was shaken, but managed to hold (even though only poor class militia).   The attackers were also shaken, and could not launch another attack that night.  It would take too long to replace them with fresh troops, so the Bavarians remained in control of all of Kufstein at the end of the battle.   They could, and did, claim a victory.

At the end of the battle there were five Austrian infantry brigades and one battery who were not shaken or in rout.   Every single Bavarian and Baden brigade were either in rout or shaken. 

It would be pretty well impossible for the Bavarian/Baden army to hold the city for a second day of fighting.  But that had also seemed the case at Obersdorf, and they actually won the second day of battle there.

But now the Austrian army was desperately short of supplies.   All six armies had suffered heavy casualties, though not as much as the Bavarian/Baden army.   If Schwarzenberg risked a second attempt to take Kufstein, and failed, his whole army might well be destroyed.  

Overnight both commanders would study the strength returns and supply reports and decide who would blink first!