Sunday 31 July 2022

Kufstein Campaign Day 2


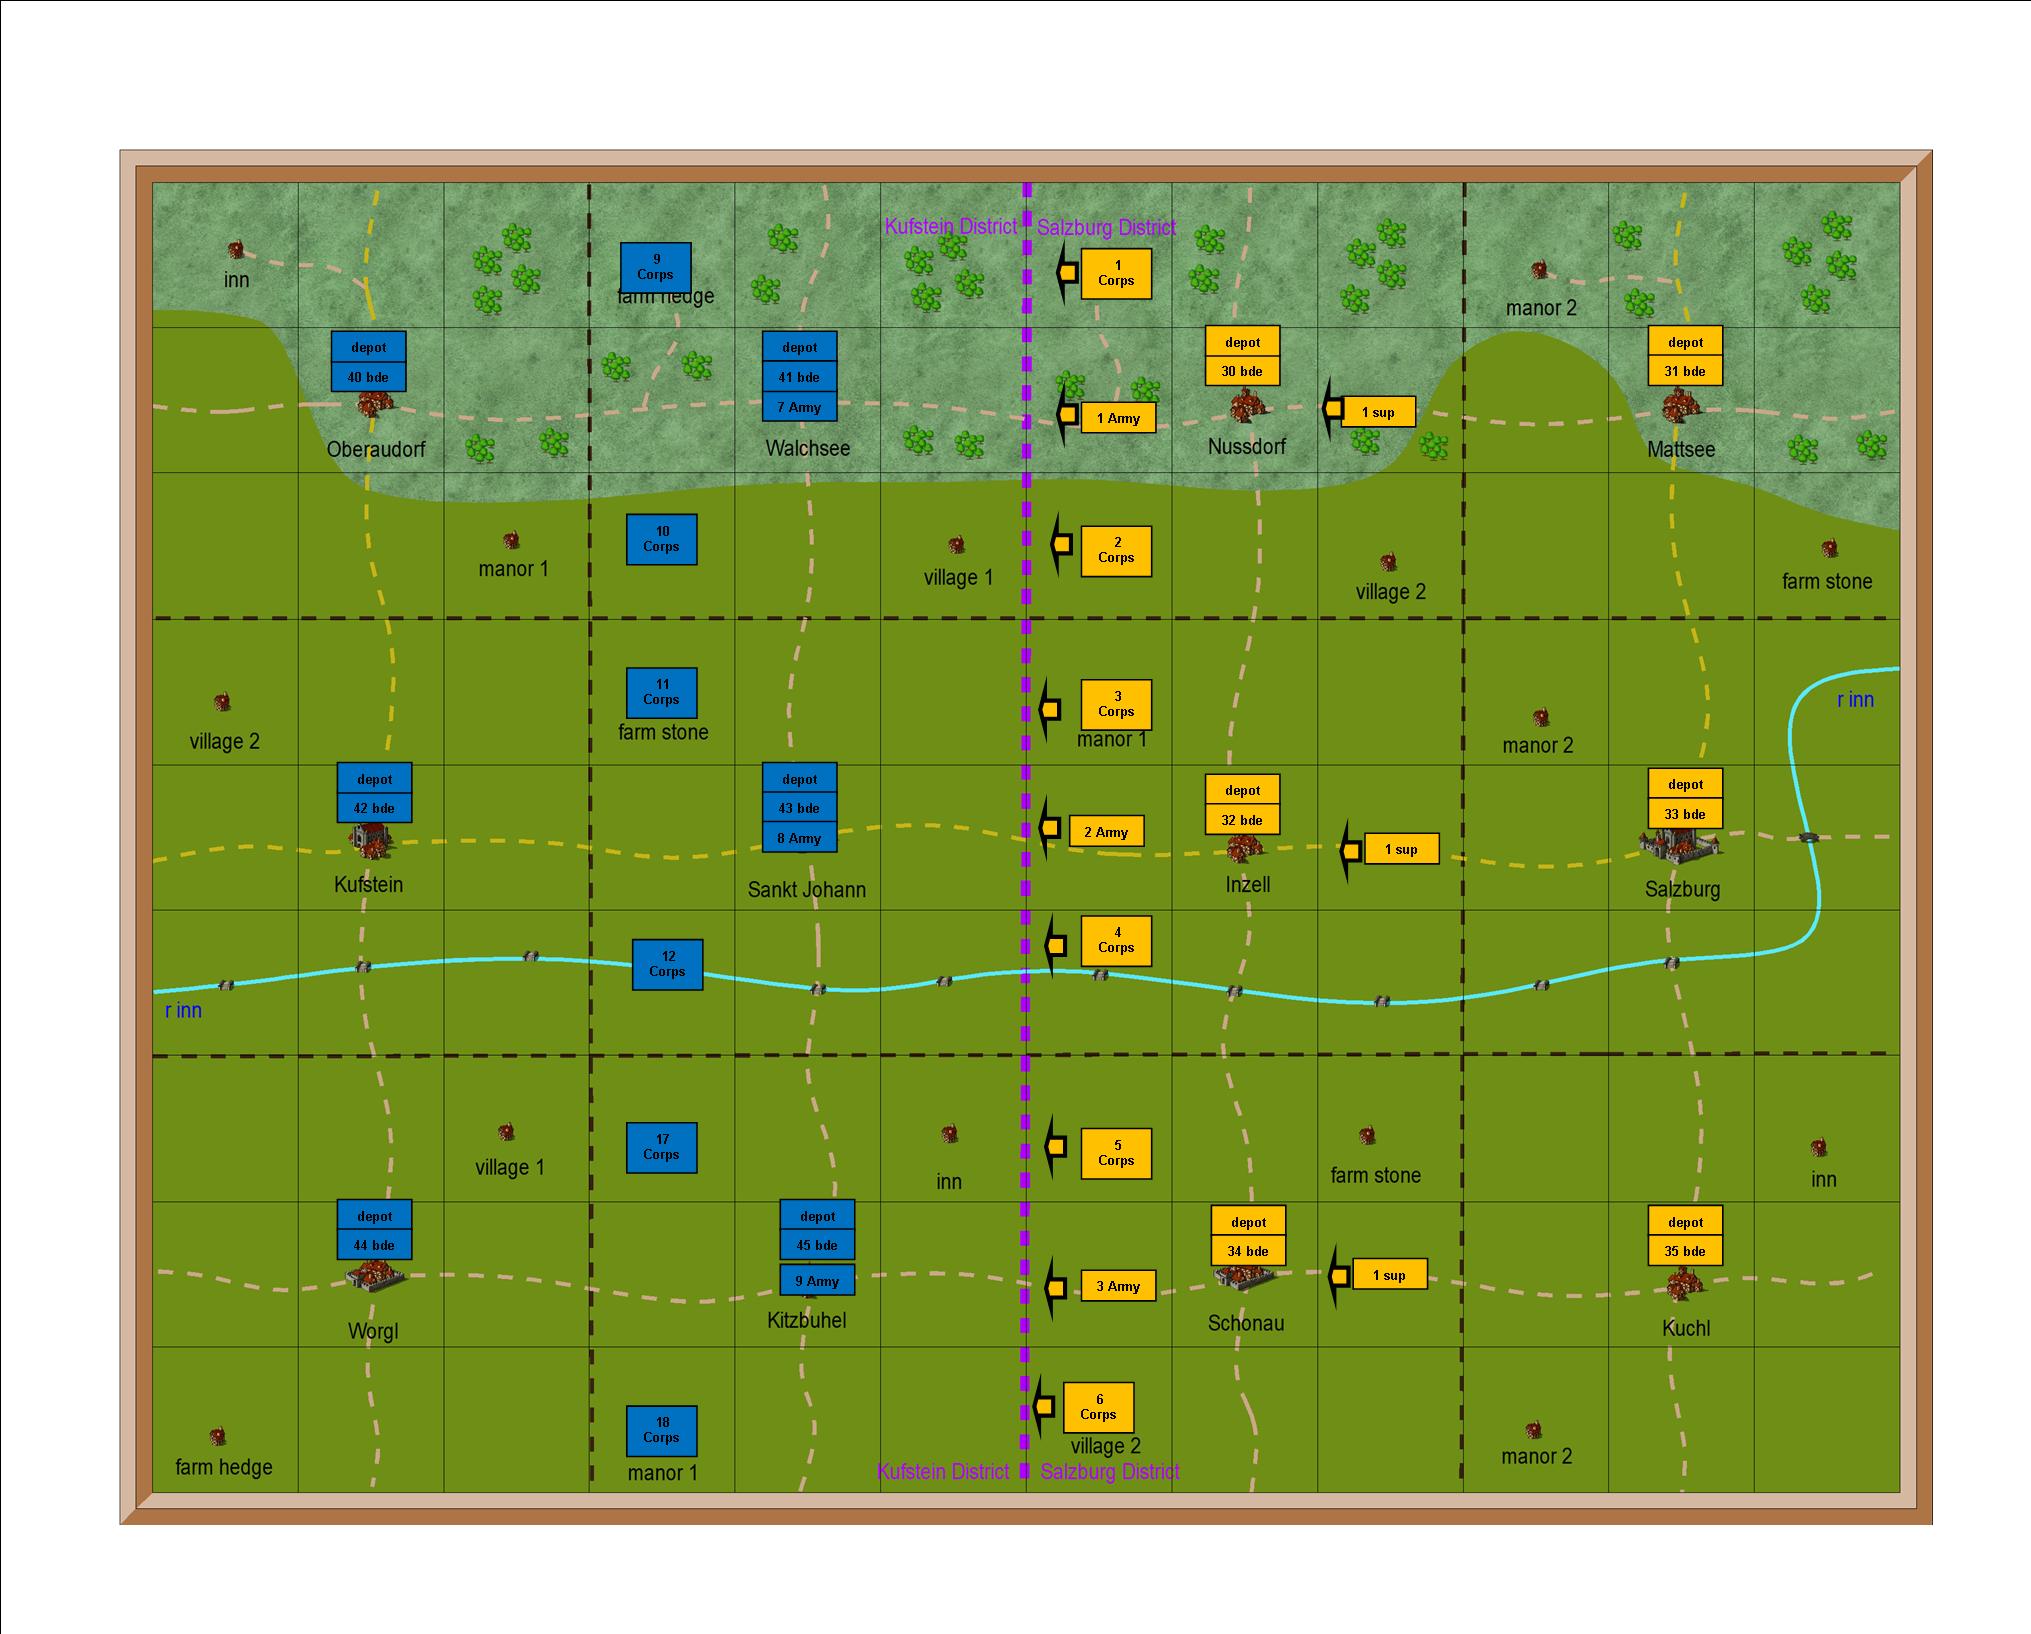
22 May 1813 - Southern Germany - Day 2

Marshal Massena orders the Bavarian army to advance towards the border.   His intention is to defend Walchsee, Sankt and Johann and Kitzbuhel and not to cross the border and attack the Austrian army.

General Schwarzenberg orders the Austrian army to halt on the border and resupply.   However he orders 3rd army, south of the river Inn, to cross the border and attack Kitzbuhel.  

Battle of Kitzbuhel

Both armies start the battle at full strength

The French have 9 infantry, 2 cavalry and 2 artillery brigades

The Austrians have 8 infantry, 2 cavalry and 2 artillery brigades


Marshal Victor takes the best infantry brigade from each corps to support the garrison

17th and 18th corps are ordered to move forward to support the town


General Merveldt takes the two best infantry brigades from each corps to form the attack force

This leaves 5th and 6th corps weaker than their opposing French corps

Their orders are to contain the enemy, but not to attack

It is his intention to take the town with his strong reserve of four infantry brigades


The Austrians win the battle of Kitzbuhel.

French suffer 9 infantry, 1 cavalry and 1 artillery casualties (3800 men)

Austrians suffer 3 infantry and 1 cavalry casualties (1300 men)


Comment

The Austrians open the campaign with an attack on Kitzbuhel, south of the river Inn

If they win they hope to cause the French to retreat from their battle line along the border


Both armies are full strength, but the French also have a conscript brigade as garrison of Kitzbuhel

However both French corps are still in their peace time locations, four hours west of the town

This is so that they can receive supplies from the three western towns


The Austrian plan is to attack the town with the four best infantry brigades in the army

The two corps will then be outnumbered and will attempt to pin, but not attack, the French


5th Austrian corps (north of the town) deploy with their artillery at short range from the town

The French cavalry advance to attack the guns, but are driven off by the Austrian hussars

The Austrian guns cause 30% casualties causing the French to commit their reserve brigade

The Austrian infantry take the northern half of the town and rout both French brigades

All four Austrian brigades then attack and take the southern half of the town


The terrain south of the town makes it impossible for 6th corps to deploy at close range of the town.

They exchange fire with 18th French corps, but neither side do much damage


The French played a very defensive game, and paid the consequences.   Both corps were stronger than the Austrian corps opposite.  But neither took advantage and attacked.  In the north this was due to the loss of their cavalry early in the game.   In the south it was due to difficult terrain

The French were outnumbered in the centre, and worse still half of the Austrian artillery were allowed to deploy within close range of the garrison.

The advantage always lies with the attacker.   The defender must deploy first, and the attacker can then concentrate to attack the weakest part of the defence.  

Despite this the attacker must gain an advantage, particularly to attack a strong garrison.   This usually puts him at a disadvantage, for example 5th Austrian corps outnumbered by 17th French corps.  But the defender must counter this early in the game.  This is why the French sent forward their cavalry.  But having lost the melee, even though the cavalry did rally later in the game, they were unable to send forward their stronger infantry to attack 5th Austrian corps.

This was disappointing start to the campaign for the French.  However the Austrians needed an early victory to push the French back from their strong defensive positions on the border.

Wednesday 27 July 2022

Kufstein Campaign Day 1


21 May 1813 - Southern Germany - Day 1     


The Austrian army advance to the Kufstein/Salzburg border

This brings them within attack distance of Walchsee, Sankt Johann and Kitzbuhel

However it takes out of supply range of their depots at Mattsee, Salzburg and Kuchl

All three towns forward supplies to the forward depots at Nussdorf, Inzelll and Schonau 


The Bavarian army is surprised by this movement and remain in their peace time locations.  This keeps them within supply range of all six depots

Comment

To receive supplies a corps must be formed (no brigades routed), stationary, not in contact with the enemy (at least one map square between them) and within one days march (three squares) of a depot.

On the map all six Bavarian corps are able to receive supplies from the six depots in Kustein District.

By moving up to the border all six Austrian corps are out of range of the three eastern towns in Salzburg district.   However they can move supplies to the three forward towns.   They are allowed three convoys per day, and each convoy can take up to four days supplies.

If a corps runs out of supplies it cannot attack the enemy, but it can defend itself.   It will lose 10% of one brigade each day that it remains out of supply, that is 400 infantry or 100 cavalry or gunner.   The corps commander can decide which brigade will lose these men.

Each depot collects one day’s supplies each day that it is not under attack.

Each army has a minimum of 30 days supplies.   This is normally four with each corps, and one with each depot.   If a town/depot is captured by the enemy they take possession of all it s current supplies.   This may bring their total to more than 30 days.   The side which loses the depot will receive their supplies at their main depot, in order to maintain the minimum of 30 days.  

Sunday 24 July 2022

Start of Kufstein Campaign


Southern Germany

The next campaign phase takes us to southern Germany with the colourful uniforms of the Austrian and Bavarian armies.  The light blue of the Bavarian infantry, and the white and blue of the Austrian Hungarian infantry are amongst my favourites.

Start of Campaign

Kufstein district is right in the middle of the Tyrol area of southern Germany, between Innsbruck and Salzburg.   Obviously a very hill terrain, and not particularly well suited to Napoleonic battles.  

When I first considered this campaign phase I played around with the idea of including guerrilla bands of Andreas Hofer style irregulars.  I do not have any suitable figures, but the irregular combat would not be included on the wargames table.  And when a garrison was required I could use Spanish guerrillas.    But he was shot by the Austrians in 1810 and the Tyrol became part of Bavaria.  

I am never sure whether to make the field armies responsible for the garrison of towns and depots, or whether to have a reserve army charged with this task.   If the field army is responsible it makes them weaker as they take new towns, but it reduces the size of corps on the wargames table.   In this campaign I have compromised by giving both sides a reserve corps of six brigades.   That is sufficient to provide garrisons on their own side of the border.  But if they capture a town from the enemy they will have to provide a garrison from the field army

The Austrian campaign objective is to take and hold Kufstein (centre far left).   So they will have the initiative and the campaign will start when they cross into Kufstein district.

The Bavarian objective is to hold all of Kufstein district.

Lots of hilly terrain making movement and deployment difficult, especially for the attacking Austrians.   And the river Inn cuts communication between both armies.

Looking forward to this campaign.


Sunday 17 July 2022

Battle of Waterloo Fun Game


Wargame Map

There is a lot of administration when one campaign phase ends and I have to prepare for the next  one.   It can take a couple of weeks to complete, and during that time we don’t have a wargame on the table to play.   We are used to having a couple of moves most days, so this can be annoying.   And particularly at this time of year when it can be very hot here in Spain, and we rely more on our wargaming than during the cooler months.

This time I have decided to have a one off fun game, very loosely based on Waterloo.  It is many years since we last did this, and we both quite liked the idea of a game outside the constraints of the 1813 campaign.

I would stress that this is not a wargame of Waterloo.   The terrain is wrong, the buildings are wrong , the orders of battle is wrong, the whole concept is wrong.  It is just a fun game inspired by the famous battle

We used the same scenic boards and corps organisation as in our 1813 campaign,  but the British corps do not have their Portuguese infantry brigades.   The order of battle is:

Brigades              French                   British

Infantry                   12                          9

Cavalry                     3                          3

Artillery                     3                          3

The game would last our usual 12 moves, each move representing one hour.  

The French objective was to take the cross roads

Table at start of game

The British are deployed on the left , with one infantry brigade in each of the three fortified farms to their front.   Wellington is centre rear.  He does not command any troops, but can take command of any brigade by moving into base contact with them

The French are deployed in column of march on the right.   Napoleon is centre rear and can also take command of any brigade by moving into base contact.

Both armies are out of artillery range at  the start of the game.

The French advanced their artillery to short range of the three buildings.  These were held by elite British brigades, and supported by their artillery.   The French artillery were in place by the end of move one, but it would be move 6 before they inflicted sufficient casualties on the garrisons for the French infantry to attack and take them.   There were then only six moves left for the French to take the cross roads.

The British artillery dominated the open area between the three buildings.   The French cavalry were sent forward to cover the massed infantry attack.   Two of the three French brigades were broken by the artillery fire and by British cavalry counter  attacks.  By the end of move 10 the cavalry on both sides were withdrawn.  

On the left the 4th French corps took the ridge behind Hougoumont.   Only one of the four British brigades remained formed, and they covered the retreat of the rest of 1st British corps

On the right 3rd French corps took the ridge and routed all of 3rd British corps.  They were then able to move infantry and artillery to support the main attack in the centre.

1st French (Guard) corps advanced to take the cross roads.   This was the most  heavily defended area of the whole table, and they suffered heavy casualties.  By the end of move eleven all three French artillery brigades were firing on the cross roads.   The Guard infantry suffered heavy casualties, but managed to rout 4th British corps.   At  night fall the only one British infantry brigade remained to cover the retreat.

Comment

This wargame was never intended to be a serious refight of Waterloo.   The table paid only a passing resemblance to the actual battlefield.   The orders of battle were nothing like either Wellington or Napoleon armies.   The rules were our standard campaign wargame rules, designed to provide a fast, fun game.

Despite this the course of the battle was similar.  The three villages held up the French for half of the game.   The French took the high ground either side of the cross roads, but struggled to  take the centre.  In fact during the closing phase of the game it  looked like they would run out of time and fail to take their objective.

The stars on the photograph indicate brigades in rout.   The French has four, compared to fourteen British brigades.  However this is a reflection of how our wargame rules work, rather than a complete French “walk over”.   To create a clear winner my rules rely heavily on morale.  As the battle develops both sides suffer casualties, which in turn reduce their ability to survive a morale check.   When one brigade does rout, all friendly brigades within 4” have to test their own morale.  Quite often one or more will join the rout.  This in turn forces other friendly brigades within supporting distance to test their own morale.

This was a really enjoyable game.  It was nice not to have to consider the consequences of the outcome, and therefore to just  fight to the end.   Not sure I would want to play too many games like this, but it was a nice way to cover the gap between the end of one campaign and the start of the next.

Sunday 10 July 2022

End of Llanes Campaign


Battles fought


This was a very frustrating campaign for the French player, which was me. 

It was not so much the outcome of the five wargames, as the French won two of them.   It was more the unrelenting good luck of the Spanish, both regular and guerrilla.   They even won the first game of the campaign, even though the odds were very much against them.   The French attack on Cabezon was a surprise, and the Spanish were not concentrated.  Yet they managed to hold the French and win the day.

The Spanish army which formed part of Wellington’s Army of the North is by far the best of the four in Spain.   This was deliberate because they form a third of Wellington’s army, and have to be able to hold their own against the three French armies in the north of Spain.   This is achieved by improving their combat and morale to the equal of the worse of the three French armies.   It is then down to the Spanish player, usually Jan, and the luck of the dice.   Over the years I have experimented with grading the Spanish armies.   At present they are slightly better than previously.   But I don’t think that is the reason for Wellington winning this campaign.

Once more it came down to the guerrilla activity and the effect on the French supply system.   All guerrilla combat is off table.  I have never enjoyed skirmish Wargaming, though I have tried it a few times over the years.   So any guerrilla attacks on either garrisons or convoys is decided by the rules and a dice roll.   The rules give the French a decided advantage, and the guerrilla need a high dice roll to inflict any damage.   However when they do it can have long lasting and serious damage to the French.   The worse that they can do is capture a convoy or a garrison.   If they do so they deprive the French of the supplies involved, usually 2 to 4 days.   These are replaced the next day at the main French depot, but it can take days to redistribute them to the forward depots where they are required.   This in turn can delay the French corp(s) concerned in returning to full combat condition.

When a battle if fought both corps go through a three day recovery period.   On the next day the loser retreats, the winner occupies the town captured and takes possession of any stores held there.   On the next day both rally, regroup and resupply.   They can only do so if they are in supply and not in contact with the enemy.   All routed and shaken brigades become formed again.   Regroup means that Infantry casualties are concentrated in the brigade with the most casualties, but all corps affected keep at least 10%. Resupply is only possible if the corps is within one days march of a supply depot, and then it must have sufficient to bring the corps up to four days supplies.   If all of this is completed then all corps are ready to fight again on the third day

In this campaign the disruption of the French supply system by the guerrillas meant that there was not sufficient supplies in the nearest depots to the recovering French corps.   As a result they were not ready to resume operations on the third day.   This allowed the British/Spanish corps, who were always in supply, to dominate the campaign.   Even when the French did win a battle they were unable to exploit it due to lack of supplies.

I feel that all of this reflects the problems faced by the French armies in Spain and Portugal.   But it is still very frustrating trying to keep the campaign on the desired time table which should produce six battles within six or seven days.  This means we always have a wargame on the table, and the campaign is fast and unpredictable.    

As always I enjoyed the campaign, but it was more frustrating to run than is usual

Sunday 3 July 2022

Llanes Campaign – Day 9


19 May 1813 – North Spain – Day 9

Soult has redeployed his army to the Santander border

10th army hold Torrelavega

11th army occupy Reinosa

12th army hold Aguilar


Wellington has redeployed his army to the Llanes border

1st army hold Comillas

4th army hold Cabezon

2nd army hold Camon


Comment

After nine days both armies are effectively in the same positions as when they started the campaign.   The French hold the Santander side of the border, the British the Llanes side.

Both armies have suffered considerable battle casualties, even taking into account reinforcements received.   Both are weary and in desperate need of rest and reorganisation.

Wellington’s army are however well supplied.   Four of his corps have the maximum of four days supplies, the other two have three days supplies.   All of his depots hold sufficient supplies to ensure that his army does not go hungry.

Soult’s supply situation is desperate.   Two of his corps have a respectable three days supplies, but the other four have only one day’s supplies.   Worst still all of his depots, except for Santander, have insufficient supplies to do more than maintain this situation.   Santander has 14 days supplies, but is surrounded by guerrilla bands and unable to secure convoys to the front line depots.

The French have completely failed in their campaign objective of taking and holding Llanes.   Indeed they have only just been able to secure the Llanes/Santander border.   They will have to send one corps from each army to secure their lines of supply and move forward  the necessary supplies from Santander.  This task will take weeks rather than days.

Wellington is the clear winner of the campaign.