Sunday, 13 November 2022

Weekly Deadlines


Wargame 

When we retired to Spain in 2006 Jan and I had two hobbies which we wanted to pursue

One was, of course, Wargaming

The second was hill walking


We are fortunate to have a permanent wargames room to pursue the first

And our 1813 campaign was developed to provide an endless supply of wargames


We are also fortunate to live is a very beautiful part of Spain, well known as an impressive area for hill walking

This is the main reason we choose the Jalon valley, half an hour drive inland, and a world apart, from busy Benidorm


Within a year of moving to Spain we had established a weekly routine, which we have followed ever since

One day a week we walk, currently we lead a U3A walking group

Most days we spend an hour at the wargames table


We also record both interests in a series of blogs

The wargames blog was started as record of my various projects

A second blog was soon added to record the progress of my 1813 campaign

The third blog was to keep family and friends in the UK up to date with our new life in Spain.


The weekly routine worked well until recently.

I could complete one wargame a week, have an enjoyable walk and update the three blogs


Jan has long suffered from problems with her neck, and recently this has got worse

The doctor has advised that she should avoid the jarring effect of hill walks over difficult terrain

This has become a very important part of our social life here, and to give it up would be a real loss

So we decided to create a second U3A walking group, this time gentle morning walks around the valley

This has been a great success, and we have made many new friends

When we meet each Thursday I am reminded of an expression we had in the army for those reporting sick.

They were called the “sick, lame and lazy”.

Our new group are not in any way lazy, or even sick, but many are lame

Hill Walking

Organising two weekly walking groups, and recording them on our blog, has greatly increased my workload

I find it harder and harder to find time to keep the campaign administration up to date and fight a wargame each week

Finding time for the wargame is no problem, but after each battle it takes the best part of a day to update the campaign

Instead of being one day, and one battle, ahead of the weekly blog dateline I am now struggling to complete the current one in time


I have always considered that Wargaming is a hobby, and as such should be enjoyable and not a chore

But now I realise how much I actually enjoy the discipline of the weekly routine

The blogs greatly add to my enjoyment of both Wargaming and hill walking

I also find that I have a very rewarding “following”.

More so perhaps on the walking blog and Facebook.


But it does mean that I will have to abandon the current objective of posting one campaign day and battle each week on this blog

I am sure that most of you will not actually notice the change

But just in case any of you do notice, I wanted you to know why.


I am very aware of  how lucky we are to be able to pursue such a pleasant lifestyle

And I am not in any way complaining about “my lot”

But it is interesting how we make our own life difficult by these self imposed deadlines

Understandable when it is necessary to earn a living

But quite silly when we are retired and can prioritise as we wish

Sunday, 6 November 2022

Goslar Campaign Day 4


4 June 1813 – Northern Germany – Day 4

Prussians attack Liebenburg

In the north Prussians attack Liebenburg

In the centre both armies resupply and reorganise

In the south Prussians enter Lauterberg, French retreat to Osterod

The battle of Lauterberg – end of move 12

The Prussians were unlucky to have lost this battle

They took the woods on the left and routed 6th French corps

The CinC reinforced 8th corps for the main attack in the centre

They took heavy casualties on the right, but managed to support the attack in the centre

But they lost the critical infantry melee in the centre and failed to take the town

The French lost 9 infantry, 4 cavalry and 2 artillery casualties (4200 men)

The Prussians lost 10 infantry and 7 cavalry casualties (4100 men)

The French has 8 brigades in rout, the Prussians 7 brigades.

The Prussians failed to take the town and lost the battle


Comment

The very busy, and complicated, photo of the end of the game tells the story

Blue stars are French brigades in rout

Grey stars are Prussians brigades in rout

White stars are the critical infantry melee


The Prussians broke and routed 6th French corps on the left

They then swung right through the woods towards the centre


They lost the battle on the right, but managed to advance when the French redeployed


The Prussian attack in the centre was well supported by cavalry and artillery

They routed the French cavalry, but caused too few casualties to the infantry in the centre

Despite this the Prussian infantry attack outnumbered the French infantry defending

However the dice were against them


It was a very complicated and very tense wargame

Everything went well for the Prussians and it seemed like their attack in the centre would succeed

The final melee was three Prussian against two French infantry brigades

The French were in line and the Prussians in column

The Prussians had the edge, but not the luck of the dice.


Both armies suffered heavy casualties

Both would need to regroup and redeploy before they could commence fighting

This would allow the French to concentrate in and around Leibenburg.


We enjoyed this game so much that we played it twice

The first time the Prussians won, the second they lost

A final dice throw decided which game would be recorded for the campaign.


Sunday, 30 October 2022

Wargaming Napoleon and his Guard


I suspect that most Napoleonic wargamers have a Napoleon figure and at least one French guard unit, probably grenadiers, in their collection.

In early 1970 I had been wargaming for about a year, using Airfix plastic figures.   I borrowed a copy of “Charge, or how to play Wargames” from my local library.  This was a hardback book with glossy pages and lots of black and white photographs.   At the end was a list of model soldier manufacturers and the cost of their figures.   The cheapest metal figure was made by Hinton Hunt.   A week later Jan and I visited his shop in Camden Passage in London.   I remember wooden trays with compartments filled with shiny model soldiers.   Amongst my very first purchase was a figure of Napoleon and a handful of French guard grenadiers.   I knew nothing of figure scales or orders of battle so I just picked a couple of each of the figures which appealed to me most.   In addition to the grenadiers I brought home a selection of Polish lancers,  British Scots Greys and RHA gunners.

They took pride of place amongst my large collection of Airfix French infantry, British Highlanders and French Artillery.  Many hours were spent playing the battle of Blasthof Heath from “Charge” to try and master the rules.

In those early days of wargaming no one even noticed if a unit of French guard grenadiers fought regularly alongside a couple of line units.   It was only when I, and apparently the rest of the British wargaming community, became aware of orders of battle for real battles which confirmed that the French Imperial Guard were actually a reserve formation which rarely, if ever, took part in actual fighting.

I have never been one for historical orders of battle, but over the years my collection of model soldiers was expanded to include a more balanced ratio of guard to line troops.   For many years the Imperial Guard gathered dust on their shelf in the wargames room.

In 2009 I decided to reorganise my whole concept of Wargaming.   I would start a fictional campaign based on the 1813 campaign.  The armies would cover all of the major, and many of the minor, players in that campaign.   The aim was to use all of my figures in a sequence of campaigns based in Germany and Spain.

Because this was a solo project I did not have to convince anyone else or defend my fictional orders of battle.   I ended up with eight French corps of 32 infantry, 4 cavalry, 4 gunners and 1 gun.   There was one old guard and one young guard corps.

I was determined that the French old guard would be elite, but not super human, troops.   One of the 4 infantry brigades would be A class, the other three B class.  This compared with a Prussian corps where the grenadier brigade would also be A, two musketeer brigades would be B and the landwehr brigade would be C. The old guard would have an edge, but only a very small one.

It has never worried me in the heat of a wargame that the old guard grenadiers might be defeated by a Prussian landwehr brigade.   If the French player rolled a 2, and the Prussian one a 6, the grenadiers would lose.

However when I type up the battle report I often wonder how this might be received by the general wargaming community if they read it on the Campaign Diary Blog. 

Sunday, 23 October 2022

Goslar Campaign Day 3


3 June 1813 – Northern Germany – Day 3

Prussians attack Lauterberg

In the north both armies regroup and resupply

In the centre French retreat to Goslar, Prussians occupy Hartzburg

In the south Prussians attack Lauterberg


The battle of Lauterberg – end of move 12

All three Prussian corps attack

On the right the French counter attack and drive them back into the woods

In the centre 2nd corps take the left half of the town

The reserve of 2 infantry, 2 artillery and 1 cavalry brigade, fail to take the right half

On the left 3rd corps break and rout 9th Polish corps.

At nightfall the French hold half of the town and claim a victory

However they have lost more casualties and will have to retreat during the night


Comment

The larger armies result in a more complex wargame

Each of the three corps on either side fight an independent battle

Both commanders create a reserve to tip the balance.


1st Prussian corps lost the battle on the right

2nd Prussian corps took half of the town in the centre, but were unable to take all of it

3rd Prussian corps won the battle on the left

The French won because they held half of the town at nightfall


Except on their left, the French fought a defensive battle

The Prussian reserve artillery had to support their losing left flank

This prevented them from supporting the main attack on the town

When the Prussian right was stabilised, the artillery were in the wrong place.


The French withdrew their artillery on the right of the town

But they were still able to prevent the Prussians attacking the right of the town

This allowed them to hold half of the town until nightfall


The Prussians won the battle on the left

The whole Polish corps was broken and routed

But 3rd corps were too far away to support the attack on the town


An interesting and quite complicated battle

It highlighted many of the problems raised by the larger three corps per side armies


The attacker has to spread his army across the whole table

He must then create a reserve to reinforce whichever of his three corps have the most success

However it can be quite late in the 12 hour/move day when it becomes which corps that is

And almost certainly some of his army will be in the wrong place at the end of the game


This feels like a realistic result.  

Once a corps has been committed to attack, it could not be suddenly redeployed to meet an unexpected setback

This happens a lot in wargames, but almost never in real life

It makes the creation of a reserve essential, as it was again in real life

And if the reserve could also only be committed once

If, as in this case, it was used to restore a setback on the right it could not also be used in the centre


After three battles the new larger three corps armies are providing different and interesting tactical problems

This was the intention, so well pleased with the results so far.

Sunday, 16 October 2022

Goslar Campaign Day 2


2 June 1813 – Northern Germany – Day 2

Prussians attack Harzburg

In the north French retreat and Prussians occupy Vienenburg

In the centre Prussians attack Harzburg

In the south French advance towards border

The battle of Harzburg – end of move 12

Prussians ignore the flanks and attack the town

French fight a defensive battle to take advantage of their strong position

This allows the Prussian artillery to deploy at close range and batter the town defenders

Just before nightfall the infantry attack and rout the garrison.


Comment

The French really should have won this battle.


Napoleon commanded the 1st French army, and it included the 1st Old Guard corps.

Jan was so confident of success that she decided on a defensive battle

Napoleon commanded a small reserve of one infantry and one cavalry brigade

The town was strongly held, and the flanks would deploy level with the town

The Prussians would be bombarded as they advanced

It was not anticipated that the French would need to counter attack


As Prussian commander I created a strong reserve of 2 artillery and two elite infantry brigades

This was placed to the left of the main road in the centre, and would be the main attack force

On the right 4th corps would take a defensive position and pin the French left

In the centre the weakened 5th corps would support the attack on the town

On the left 6th corps would take the farm and pin the French right


All went well until the end of move 10.


On both flanks fighting was restricted to cavalry engagements and artillery fire


By move 6 the Prussian reserve artillery was firing on the garrison at short range

The French artillery on the flanks quickly concentrated on the Prussian gunners

But most of this artillery fire was very ineffective.


During move 11 both French garrisons received 10% casualties, but passed their morale test

On move 12 they again received 10% casualties, both failed their morale test and were shaken

The waiting Prussian infantry stormed the town during the last move of the game

The shaken garrison both routed, and took the supporting brigades behind the town with them


The French decision to fight a defensive battle was a sound one, and it should have worked

The town was held by two elite infantry brigades, one in each half of the town

They were supported by two conscript brigades behind the town

The flanks were strongly held, and suffered little during the battle


The flaw was relying on conscript brigades in support to counter attack if necessary

This was a risk which had to be taken, because better reserve would have weakened the flanks

It was just bad luck that at the critical moment the dice throw caused the conscripts to rout

Sunday, 9 October 2022

Goslar Campaign Day 1


1 June 1813 – North Germany - Day 1

The campaign opens with a surprise attack on Vienenburg

In the north 3rd Prussian army attack 2nd French army at Vienenburg

In the centre both armies resupply

In the south both armies resupply

The battle of Vienenburg – end of move 2

The French occupied the town, but not the hills on either side

The Prussians entered the table at the start of move 1

There was a race for the hills, which the French won


The battle opened with cavalry melee along the whole front

The French had some success, but were eventually all routed


The Prussian cavalry and artillery then concentrated on the French gunners

They were deployed in front of the town, but vulnerable without infantry or cavalry support

As the Prussian cavalry prepared to charge the French gunners withdrew into the town

This allowed the Prussian artillery to advance and unlimber at short range of the town


Meanwhile the Prussian infantry attacked the hills either side of the town

Three brigades were routed, but the Prussian cavalry then supported their infantry]

This forced the French infantry to form square, which were broken by Prussian columns


With the loss of both hills, and Prussian artillery at close range, the French garrison withdrew

Prussian infantry were then able to occupy the town unopposed


A convincing Prussian victory


Comment


This was the first wargame with the larger three corps armies on each side.

You will see from the photo above that one corps occupied each scenic square

The French CinC formed a grand battery of the guns from all three corps in front of the town


The Prussians did not arrive on the table until the start of move one

Both Prussians and French were the same distance from the hills either side of the town

This resulted in a race to occupy the hills, which the French won


The Prussian CinC took command of half of 8th corps, plus artillery from 9th corps

He sent the guns forward to engage the French gunners

But both his infantry, and 8th corps, remained outside the range of the French artillery


7th and 8th Prussian corps advanced to attack the hills

The cavalry covered this advance, and were quickly engaged by the French cavalry

After a prolonged melee the Prussians won and the French horsemen routed

This allowed the Prussian cavalry and artillery to concentrate on the French gunners

When they withdrew their guns into the town the Prussians could attack the centre


But first there was hard infantry fighting for possession of the hills

The French soon had the upper hand, and it looked likely that both attacks would fail

But as the gunners withdrew, the Prussian cavalry moved to support their infantry

This forced the French infantry to form square, and they were no match for the columns


The battle ended in a convincing Prussian victory.

However a closer look at the casualties will show just how close it was

The French have lost 7 infantry and 4 cavalry casualties (3200 men)

The Prussians have lost 7 infantry, 3 cavalry and 1 artillery casualties (3200 men)


A very different wargame with three corps per side slogging it out

Had the French not lost all of their cavalry it would have been very different

The French gunners would have dominated the centre

The French infantry would have held both hills

The Prussians would have lost the battle.


Sunday, 2 October 2022

Start of Goslar Campaign Phase


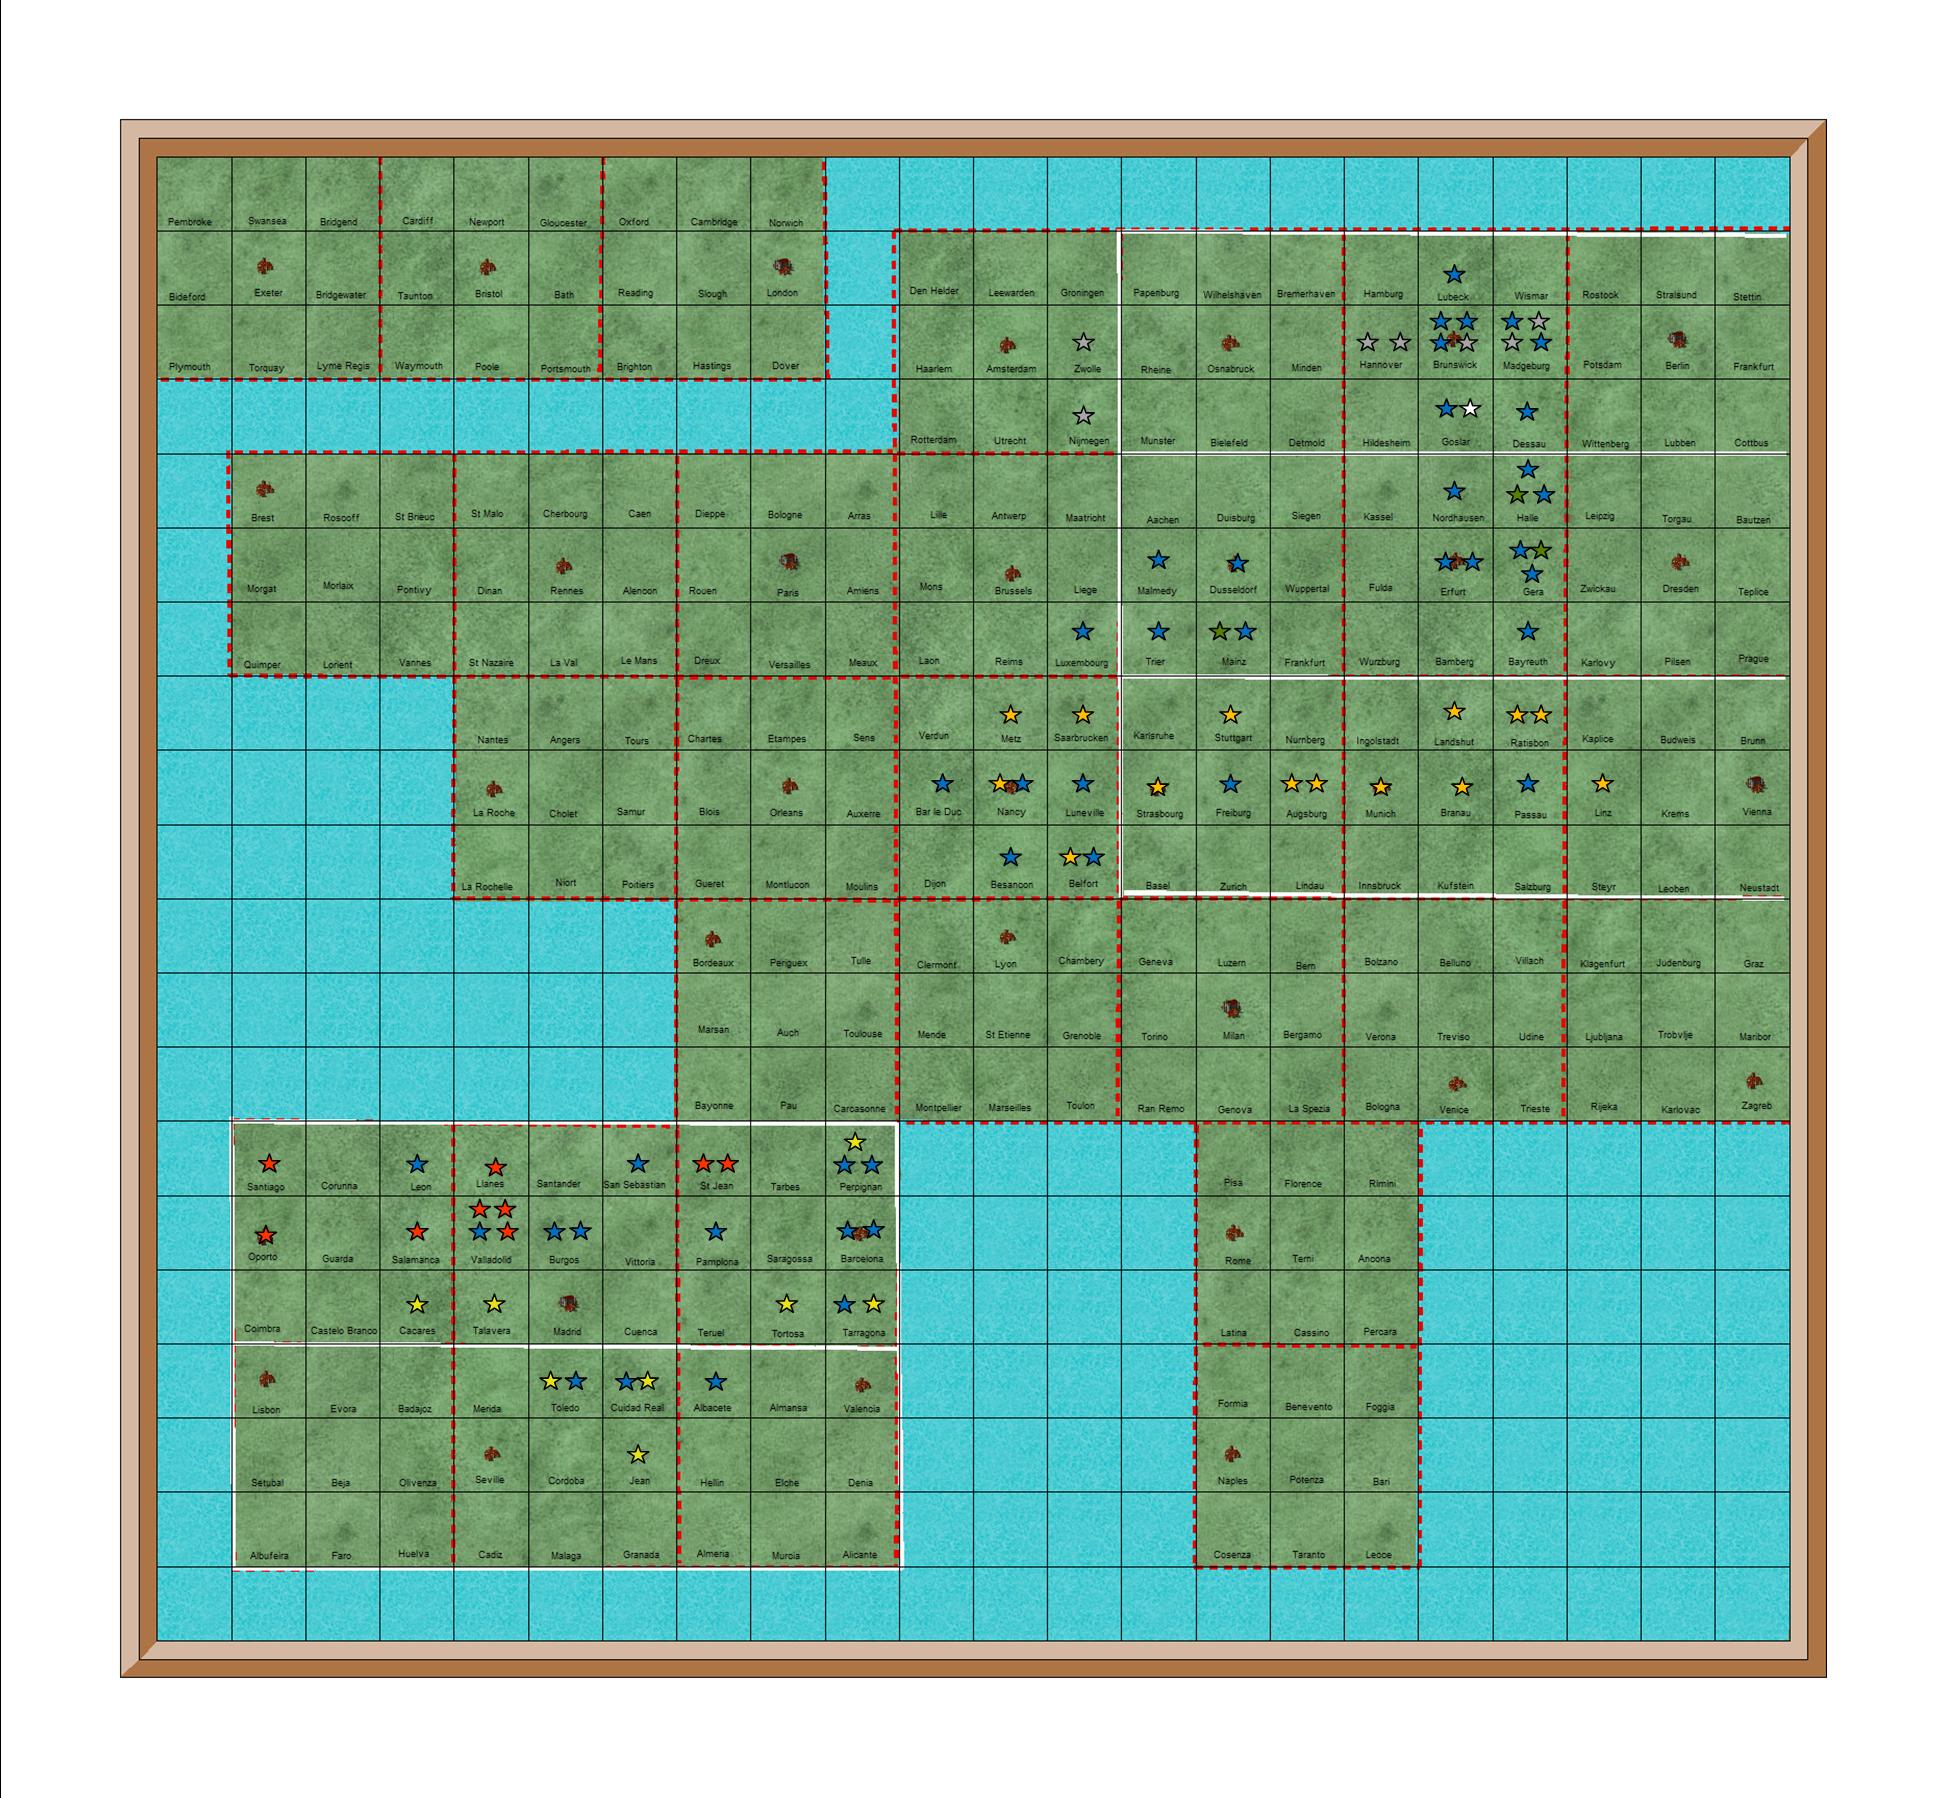
Map of Europe showing military regions and location of campaign phases


This will be the 83rd campaign phase since the 1813 campaign started in April 2009.

The location of each phase is shown on the map above, the colour indicating which side won.

There have been six revisions of the campaign since then, and each one resulting in new maps

Consequently many areas have been fought over more than once.

This is the current map, showing the military regions throughout Europe.

Goslar is the white star in northern Germany.


I try to make each campaign phase slightly different from the previous one

This is not as difficult as it may sound, because there are lessons to be learnt from each phase

The major difference in this campaign is an increase in the number of corps taking part

Campaign map showing location of each corps at the start of the campaign


Each side is now an army group of three armies

Each army has three corps.

You can see a full order or battle on the 1813 campaign blog here

http://1813pbemcampaigndiary.blogspot.com.es/       

This is an increase of three corps per side.

It will result in much larger battles, and more crowded wargame tables

Previously, with two corps per army, there was a large gap on the wargames table

I had to allow CinC to create a reserve to fill this gap

The new order of battle will allow one corps for each of the three scenic squares

It will also allow the CinC to create a larger reserve of artillery, cavalry or infantry.


In theory this should result in more interesting wargames, which is the aim of the campaign

But I will reserve judgement until I have play tested a couple of campaign phases.


It will also mean a reorganisation of the supply system.

In my earlier campaign phases most battles had only one, or possibly two, corps per side

The supply system of one days supply for each town held was designed to cater for this


Each corps starts the campaign with four days supplies, with one more day in each town held

A corps must be within one days march (three campaign squares) to resupply

With six corps, and six towns on each side, this worked well

But with nine corps per side, and still only six towns, it does not


The new supply system will remain the same.

Each town will receive sufficient supplies for one corps for one day

Corps must still be within one days march to receive supplies.

But the two regional capitals (Goslar and Dessau) will receive four days supplies each day

So the combined supplies will be sufficient to replace the total used each day

But a more complicated supply distribution system will be required.


To allow for this it will no longer be necessary to detach infantry brigades to garrison towns

Except in Spain, the garrison will no longer be shown on the campaign map

Nor will they take part in any wargame involving a town, unless I introduce sieges.


On the map the French (left) are dispersed to receive supplies for all six towns

The Prussians (right) are concentrated on the border to attack.

You will see that all nine French corps are within one day’s march of a depot

The Prussians are only within one day’s march of the three forward towns/depots


Each army has a campaign area three squares by twelve squares

Each army has two towns to supply three corps

So each CinC will have to organise a constant movement of supplies to his forward depots

The Army Group commander will have to distribute the extra supplies from Dessau and Goslar

It sounds quite complicated even before the campaign starts

Imagine how difficult it will be when corps move even further from their main depot

Or when a large supply is lost when a town is taken and the enemy secure the supplies there.


Once more it all works in theory, but game play will soon highlight any problems.


I am really looking forward to this campaign to see how these major changes work out