Sunday 30 June 2024

Santander Campaign – Day Five


Campaign Map

Day 1 siege of Soncillo
Battle of Medina

10 French army – rally and regroup at Laredo
11 French army – attack Medina
12 French army – lay siege to Soncillo

1 British army – rally and regroup at Santander
2 British army – defend Medina
3 British army – siege of Soncillo

Guerrilla
20 brigade – attack convoy, fail, routed with 10% casualties
15 brigade – attack convoy, fail, retreat no casualties
18 brigade – attack convoy, fail, retreat no casualties
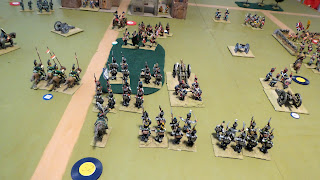
Battle of Medina – End of Move 10

Both armies start the battle with campaign casualties. This makes them vulnerable to morale tests, so they must avoid unnecessary casualties. This applies particularly to the French, who have to attack.

On the right the British cavalry charge the French as they cross the river. The French cavalry lose the melee and rout back over the bridge, taking the gunners and one infantry brigade wit h them. Without cavalry and artillery it is impossible to continue to attack. By the time they have rallied, and returned to the corps, it is too late to initiate an attack

In the centre the Westphalian corps has no cavalry support. Their cavalry brigade has been used to replace campaign casualties for the French and Italian brigades. The British cavalry take full advantage of this, and pin the Westphalians to the river bank.

On the left the Italian corps press home their attack on the Spanish held farm. The Spanish put up an unexpected determined defence, and almost win a critical melee. However eventually the Spanish break and rout. General Hill makes repeated attempts to rally them, but is unable to do so

The French have taken one objective, but the British hold the other two
The British have won this battle

French have lost 5 infantry casualties (2000 men)
British have lost 1 infantry casualty (400 men)
Spanish have lost 3 infantry and 1 artillery casualties (1300 men)

Comments

This game has highlighted the difference between a campaign game, and a “one off” wargame. In a campaign it is really important to conserve your troops. High casualties in one battle to achieve a victory will often result in comprehensive defeat in the next.

Both armies started this game with moderate campaign casualties. By this I mean that about half of the brigades have 10% casualties. This meant that their combat ability and morale was reduced by a factor of 1 on all combat or morale tests. With the use of just 1D6 to determine the outcome, that can be significant.

This is a particular problem for the attacking player. He usually has to accept some artillery and skirmish casualties as he moves into contact with the defender. When a brigade suffers casualties they have to test their morale. If they rout, all brigades within 4” also have to test. There is a real danger that just one casualties can cause two or three brigades to rout.

This is why I (as attacking player) had to play such a cautious game. I had to protect my advancing infantry from enemy cavalry and artillery fire. In one of my three corps I did not have any cavalry, but the defender did. In another I lost the initial cavalry melee and my routed brigade took my gunners with them!

With these dice driven rules you come to dream a roll of one, and are overjoyed when a six lands. And they do keep you on your toes. Even when you have achieved an initial success you can always be cheated by a particularly low roll during the final melee combat.

We like them, but appreciate that not everyone will

Sunday 23 June 2024

Santander Campaign – Day Four

Campaign Map

French attack Soncillo
French occupy Laredo
British retreat to Santander

10 French army – occupy Laredo
11 French army – rally and regroup at Ramales
12 French army – attack Soncillo

1 British army – retreat to Santander
2 British army – rally and regroup at Medina
3 British army – defend Soncillo

Guerrillas
13 brigade – return to village
14 brigade – return to village
16 brigade – return to village
17 brigade – capture convoy and 6 days supplies
19 brigade – attack convoy but routed with 10% casualties

Battle of Soncillo – End of Move 2


The French had to cross the river Ebro to reach the walled town of Soncillo.
Crossing a defended river line is one of the most difficult military tasks.
Fortunately the allied army were deployed near the town and out of artillery range of the river.

The French managed to cross the river, behind a cavalry screen
They quickly drove back 6th British corps in the centre and occupied the hill
It took longer to drive the Spanish out of the farm on the left, but they did just before nightfall

5th British corps fought hard to hold the woods. At nightfall they held the top right hand corner, but had lost three quarters of the woods.

The French occupied two of the three game objectives and won the battle

French have lost 4 infantry and 1 cavalry casualties (1700 men)
British have lost 9 infantry and 1 cavalry casualties (3700 men)
Spanish have lost 2 infantry and 1 cavalry casualties (900 men)

Comments

The table consists of 3x3 two foot scenic squares. The top three have Soncillo flanked by two woods the centre three have the game objectives of farm, hill and woods. The bottom three have the river Ebro, with one bridge in each of the three squares. The river can only be crossed by one of those three bridges.


Third British Army occupies the three centre squares. If they deploy as far forward as they are usually allowed their guns would be within range of the three bridges, as would their cavalry. This would make it impossible for the French to cross.

I decided that the British and Spanish would deploy on and around the three game objectives. They would therefore be out of both artillery range and cavalry range of the three bridges. This worked well, though 24th French corps cavalry did suffer casualties from the British artillery in the woods. Fortunately they passed their morale test and continued to screen their infantry and cavalry as they crossed the river.

The river caused a delay in the French advance, and would have caused serious problems if any of the French brigades had routed during the early stages. Fortunately this did not happen.

The game worked well, though the large woods on the right did cause a problem. Normally the four sections are too close to allow artillery to deploy and move around. I made an exception for this game. The problem was that the four sections became four individual strong points. So the French had to regroup to attack each section. This took so long that they only managed to take three of the four sections. By holding one quarter the British held the whole objective.

It’s interesting that despite the 477 battles we have fought as wargames since this campaign started in 2009, we still learn something new from almost every game.

Sunday 16 June 2024

Infantry Rules for Army Level Wargames


Typical Army Level Wargame

I don’t get nearly as many comments on this blog as I would like, but a recent one from Archduke Piccolo caused me to reconsider one element of our current wargame rules.   The blog commented on was about hills in wargames, but the comment was about skirmishers in different levels of wargame.   For example how to represent them on the table at brigade level, division level, corps level and army level wargames.

My own wargames are currently army level, with three corps per side.   The above photo will illustrate what I mean.   All games are a maximum of 12 moves, to coordinate with the campaign 12 hour day.  I have written the rules to allow for fast and fun games, but also I want to reward historical tactics.  I also want to achieve a clear winner within this relatively short number of moves.   And most important I want a large element of luck, because my wife is my regular opponent and having gamed together for more than 50 years we can anticipate what each other will do in almost any wargame situation.

The campaign includes all of the major Napoleonic armies, and many of the minor ones.  I wanted to give an element of national strengths and weakness, for example the British were well known for their effective volley fire and the Russians for their stubborn fighting style.   Equally important I wanted to avoid making any one brigade too powerful, for example British Riflemen or French Imperial Guard.   I wanted to ensure that whilst elite formations had an advantage; it was not so great that they would always win.   And at the same time historical poor performers, such as the Spanish, should also have a chance to win.  

To this end I created an order of battle which gave infantry brigade’s three combat abilities.    These are skirmish, firefight and melee.   Each brigade is graded A, B or C in each of these functions.  


A British rifle brigade would be class A skirmishers, B class melee and C class firefight.  

A French guard brigade would be C class skirmishers, A class melee and B class firefight. 

A Spanish line brigade would be C class skirmishers, B class melee and C class firefight.

Each corps has four brigades, and most have at least one class A brigade in one of the three combat types.  The exception is the Spanish, who are lucky to have more than one B class.   They always have to rely on a good defensive position, such as a village, woods or hill.

This allows the player to decide which brigade is most suitable for which task.   And even more important which brigade is weak, and must not be exposed too much.

The distance of a brigade from the enemy will determine what type of combat takes place.   If 2 to 4” it will be a skirmish combat.   0 to 2” will be musket volley.   Base contact will be melee.   A rifle brigade would pick skirmish combat; a British line brigade would prefer musket and a Spanish brigade would have to try for melee.

However it is not always possible to ensure the type of combat you want.  The move sequence is determined by drawing a poker chip from a bag, each corps has a chip.   Your rifle brigade may halt at 3”, but if the Spanish chip is before them in the next round, the Spanish brigade can charge into contact and decide the outcome by hand to hand combat.   The brigade which charges into contact gets a plus one for impact, which gives them a slight advantage.

It all sounds complicated, but it’s really quite simple and fast flowing.  The element of luck, in the form of the 1D6 and drawing a chip for who goes first, is what makes the whole game so unpredictable and enjoyable.  

I suspect that for most wargamers our reliance on the dice would be unacceptable.   I went through many different types of rules over the 54 years I have been Wargaming.   All tried to reward historical tactics.    The early ones were very simple, and then came very complicated followed by moderate complexity.   All were enjoyable, at least to start with, but lost their appeal through frequent play when the shortcomings became obvious.   Most, if not all, did not have a time limit on the wargame.   This resulted in very long games with the complicated rules, which were often abandoned due to loss of interest.

We are very happy with our current rules.   Having written them myself, and only having to keep both of us happy, I can change them at will.   So when the failings become obvious I can just tweek the rules to overcome the problem.   Will not work for everyone, but works well for us.

Sunday 9 June 2024

Santander Campaign – Day Three


Campaign Map

French attack Laredo
French occupy Ramales
10 French army – attack Laredo
11 French army – occupy Ramales
12 French army – rally and regroup at Villacayo

British retreat to Medina
1 British army – defend Laredo
2 British army – retreat to Medina
3 British army – rally and regroup at Soncillo

Guerrillas
14 brigade – abandon Ramales
16 brigade – capture convoy outside Sarautz
18 brigade – return to village
20 brigade – return to village
21 brigade – return to village

Battle of Laredo - Move 12

By day three the Wellington has had time to redeploy his army, and in particular deploy his First Army in a strong position in front of the port town of Laredo. 1st British corps hold the woods either side of the main coastal road leading to the town. 2nd British corps hold the village in the centre, 7th Spanish corps hold the extensive woods on the left of the allied position.

30th Polish corps attack the Spanish held woods. Their cavalry charge the Spanish guns, but fail to take them and retreat shaken. However their infantry take the woods section by section and hold the entire woods by nightfall

29th French corps attack the village in the centre. Their cavalry lose the opening melee rout and take the nearby gunners with them. Neither take any further part in the battle. So the French infantry have to attack the village without either cavalry or artillery support. They finally take it just before nightfall, and their light brigade beat off a determined British counter attack despite receiving 30% casualties.

28th Young Guard corps are given the most important task, the woods protecting the road to Laredo. It is held by the elite 1st British corps and fighting continues throughout the day. For most of that time the British hold the left half, and the French the right half. But in the last two hours of the battle the French finally take the left half

Having taken all three game objectives, the French have won the battle.

French lost 4 infantry. 4 cavalry and 1 artillery casualties (2100 men)
British lost 12 infantry and 1 cavalry casualties (4900 men)
Spanish lost 7 infantry and 1 cavalry casualties (2900 men)

Comments

This was a well balanced wargame in which the French had the advantage of slightly better quality troops, but the Allies had a strong defensive position. Even the poor quality Spanish corps were able to hold their own for most of the battle holding the large expanse of woods.

The French cavalry performed badly and the Polish lancers took their routed early in the game. They managed to rally and return, but lost a second melee in the closing moves of the game. In doing so they unmasked the Polish gunners, who were then routed by the British cavalry. The nearest infantry brigade failed their morale as a result and joined the rout.

The British infantry lost 12 and the Spanish 7, against 4 French infantry. But the French cavalry lost 4 to 1 British and 1 Spanish. In subsequent battles the French would miss their cavalry losses more than the British their infantry casualties

And interesting wargame, in which the dice once more played a leading role. It was surprising how often the winners of a melee would roll a 6, and the losers roll a 1 when testing their morale as a result of casualties received.

I am very pleased with how the new rules are working out. It can be very annoying to roll a 1 at the wrong time, particularly if it results in nearby brigades also rolling low to test their morale. But it adds to a fast moving and very unpredictable game. And so far the good, and the bad, dice have been pretty even over the 12 moves of a game.

Sunday 2 June 2024

Wargame Objectives


Battle of Ramales

We recently changed the game objective from the town or city to three objectives in the centre of the table.  This was to deter the defending player from slowly retreating as the attacker deployed to attack.   The defender could inflict casualties on the attacker, but retreat before the attack could be delivered.   In addition it took so long for the attacker to pursue that nightfall usually prevented any attack at all.

However our recent battle of Ramales proved that this might not be as easy to achieve as I had expected.

The game would be decided by three separate combats, one for each of the game objectives.   On the left was the hill, in the centre the woods and on the right the farm.  Although this was an encounter battle, the British and Spanish troops would reach their defensive position well before the French attackers.

The Hill

This was held by the Spanish corps, by far the weakest of the three allied corps.   However it was attacked by the Italian corps, the weakest of the French corps, and not a lot better than the Spanish holding the hill  

Hills are best held, and attacked, by infantry.  So the British Army commander took command of the Spanish cavalry and artillery and deployed them between the hill and the woods.

The French Army commander also took command of the Italian cavalry and artillery, but that was to support the Westphalian attack on the centre.   It also countered the Spanish detachment, but that was not the intention.

The attack on the hill was an easy victory for the Italians.    They used their two best infantry brigades to spearhead the attack, and routed one Spanish brigade by skirmish fire.  The remaining three Spanish infantry brigades quickly followed suit.   They ran to the woods in the rear, where they eventually rallied.  But they did not make any counter attack on the hill.

The French had taken their first game objective

The Woods

The 4th British corps, who held the centre, included two rifle brigades which represented the famous light division.   The senior brigade held the woods, supported by the second brigade and the corps artillery between the woods and the hill.

The Westphalian corps was given the task of taking this objective.  They were better quality than the Italians, but only just.   They could not risk an attack on the rifles in the woods, at least until they could drive back their supports and attack the woods from at least two sides.   This proved extremely difficult.

Supported by the Italian cavalry and artillery they easily outgunned the weaker British 6pdr guns, and also the poorly trained Spanish gunners.   However it requires a roll of six on 1D6 to hit a gun, so they would have to be very lucky.   Their reinforced cavalry should also be able to defeat the British hussars and Spanish irregular lancers.   However their artillery failed to roll any sixes, and eventually turned their attention to the supporting infantry.   Their cavalry finally won the cavalry combat, but not until they had lost one brigade.

It took 10 of the 12 game moves, but eventually the rifle brigade were driven from the woods.   The nearest infantry rushed the woods, but were halted by a counter attack by the supporting British brigade.   At nightfall only two British brigades still remained, but they continued to contest the woods.

The Farm

3rd British corps had one elite infantry brigade, and a heavy cavalry brigade.   Apart from that they were two line and one conscript Portuguese brigades.   However the foot guards held the farm.

The attacking French corps was young guard.   Not only good infantry, but also a 12 pounder artillery battery and a brigade of heavy dragoons.   Their attack should have been the easiest of the three combats.  It was not to be so

To attack the farm they had to secure at least one side as well as the front.  They could then attack with two brigades against one.   They would also hope to weaken the garrison with artillery and skirmish fire.   But first they would have to persuade the British supports to retreat.   The dragoon brigade was sent to drive off the British cavalry.   Due to really poor dice the French not only lost two cavalry combats, but they routed with 20% casualties without inflicting any casualties on the British horsemen.

The attack turned into a real slog, and by nightfall the farm was firmly held by the British.   The French managed to get into the farm, but a prompt counter attack resulted in a stalemate.

So at the end of the game the French held one objective, but the other two were still held by the British.   Victory conditions were the side which held two of the three game objectives.

The British could claim that they still held the woods and farm, even if they were contested.   Had the game gone on for another two or three moves the French would probably have taken the woods, but they would have been drive out of the farm.   But the deciding factor was that the French clearly held one of the three objectives, and contested the other two.

I gave the game to the French player.